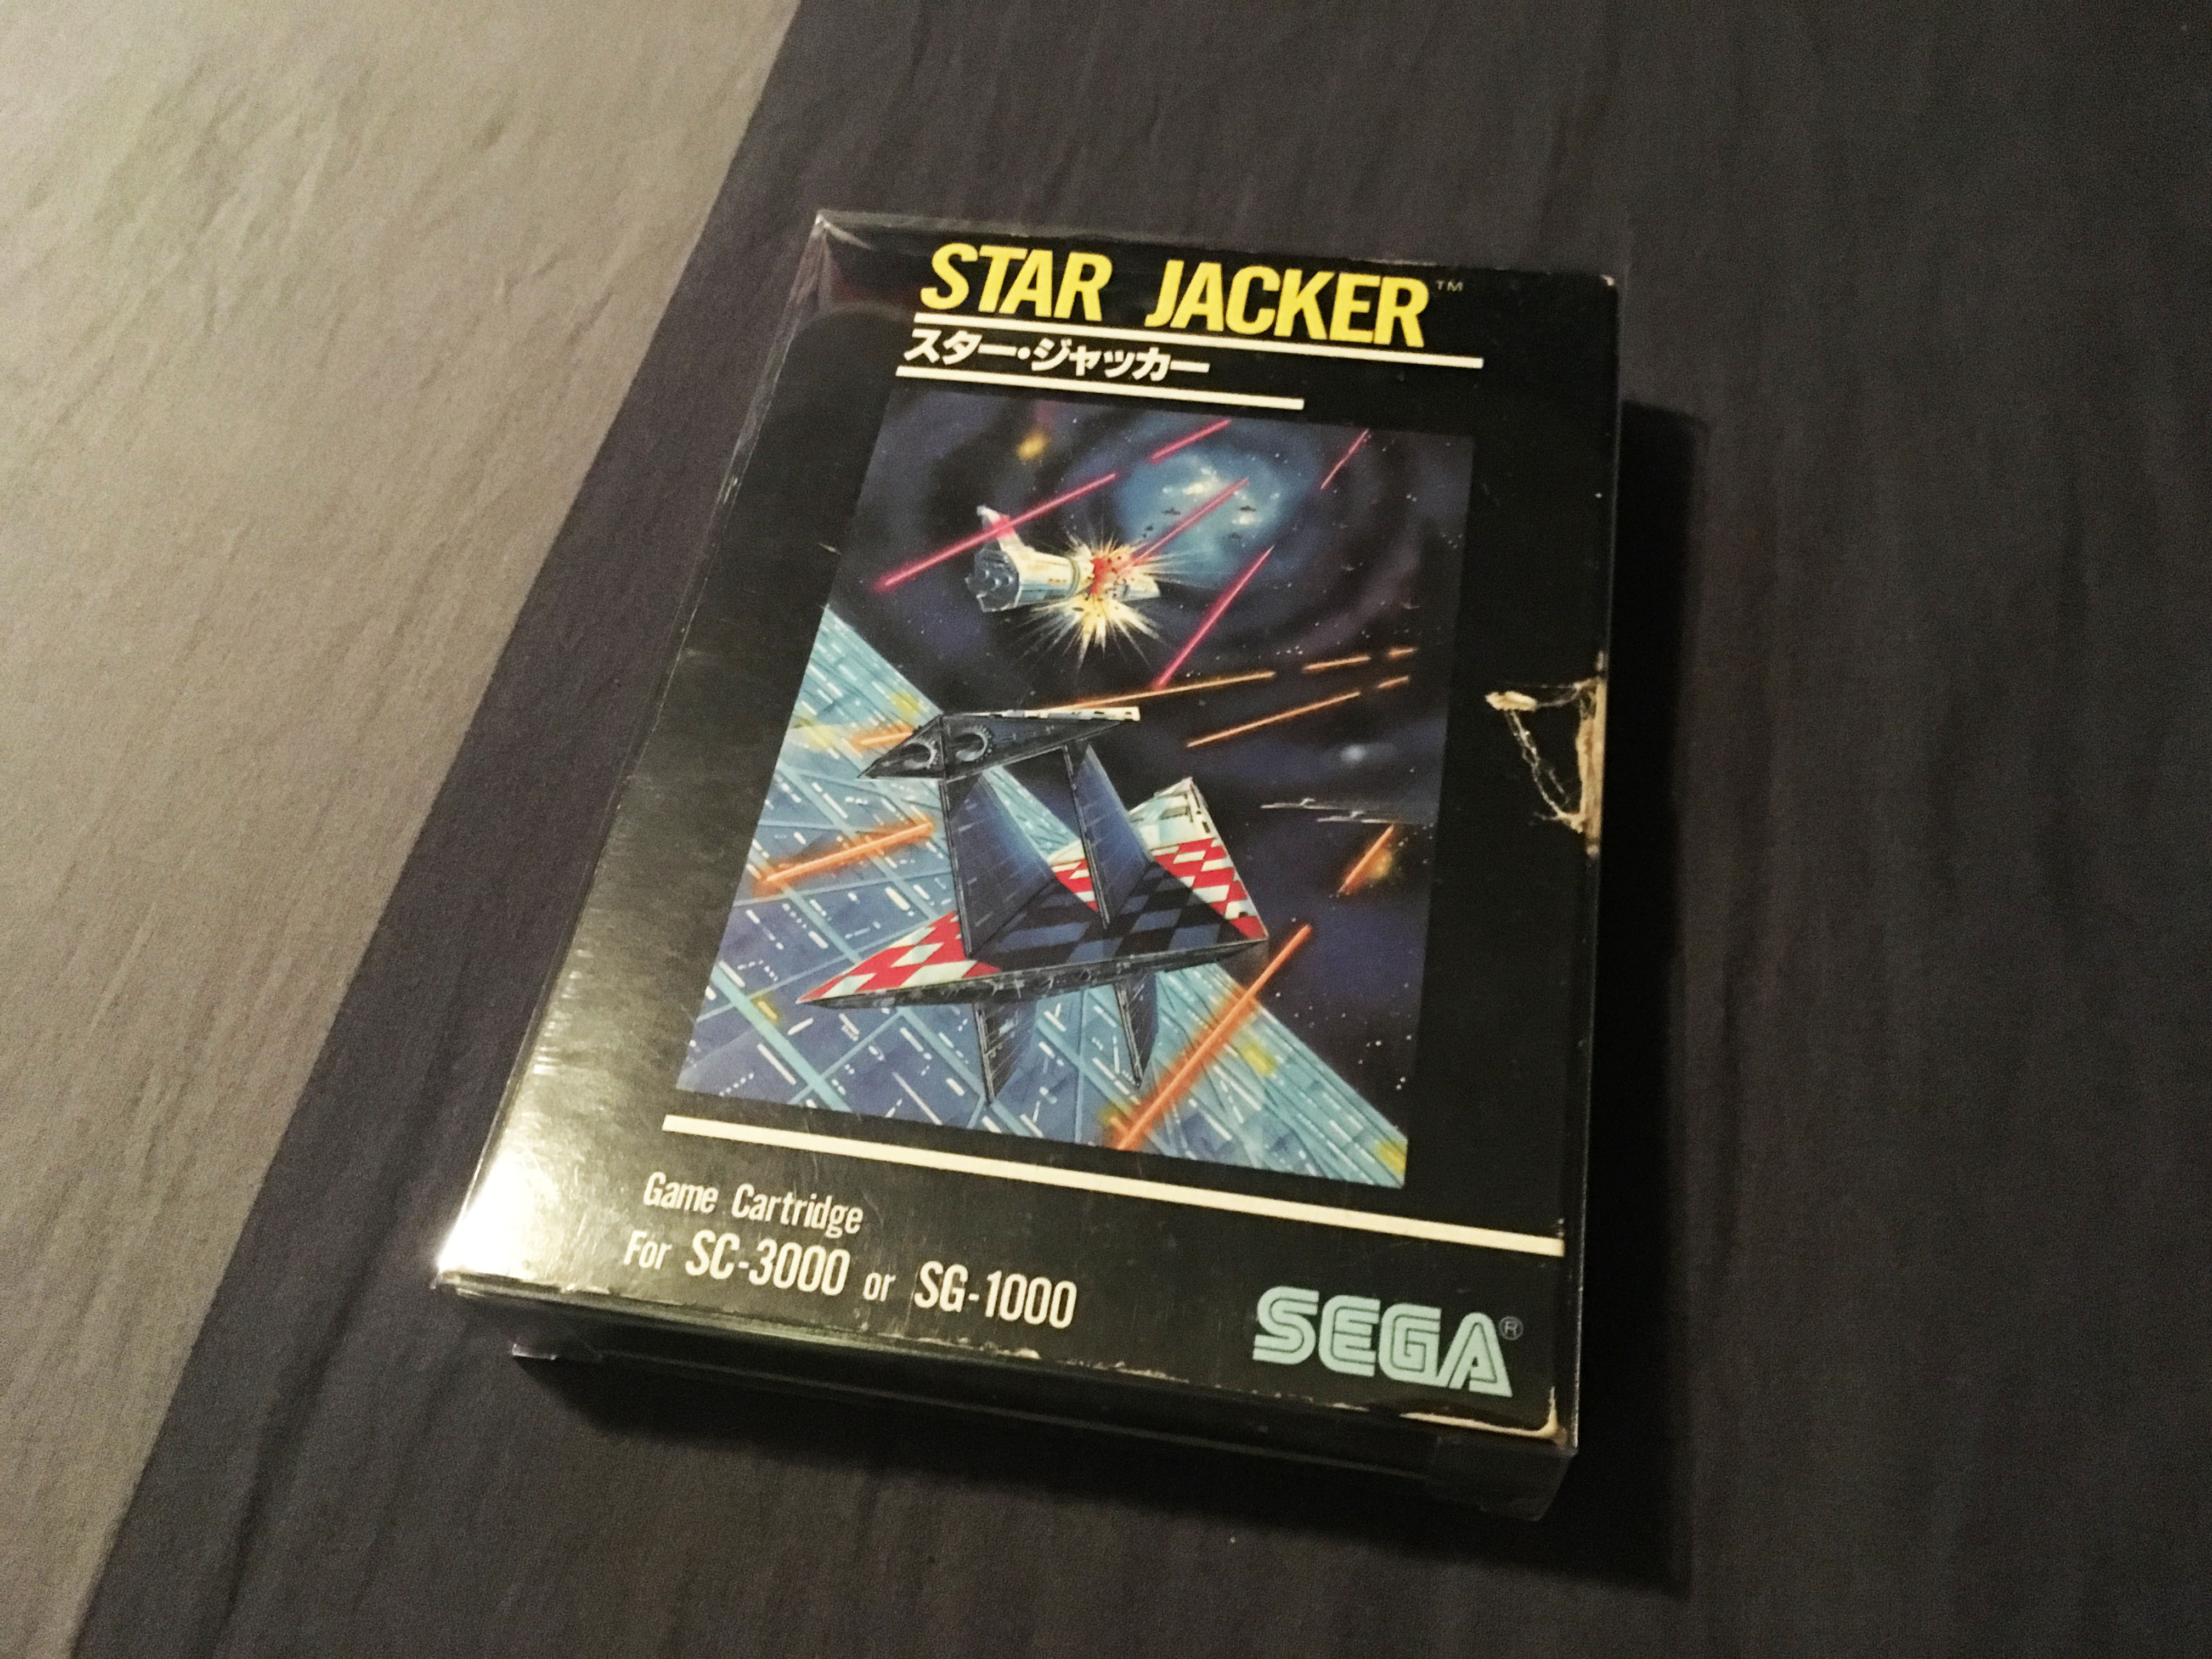
A while ago I got something rather special, the original ‘Black Stripe’ edition of the Sega SG1000. It’s also known as the ‘Germany’ model since it features a front panel with three colours that match the German flag.
This machine is somewhat analogous to the first edition square buttons Famicom model, in that it was the first ever model of the first Sega console, produced as a short initial run, but was quickly replaced by a revised model which became more ubiquitous. As such the majority of original SG1000 consoles feature the revised red/blue colour motif matching the blue Sega logo.
This one was in pretty rough shape physically, and was sold as ‘untested’. But it powered up fine.
And it booted and played a game perfectly the first time!
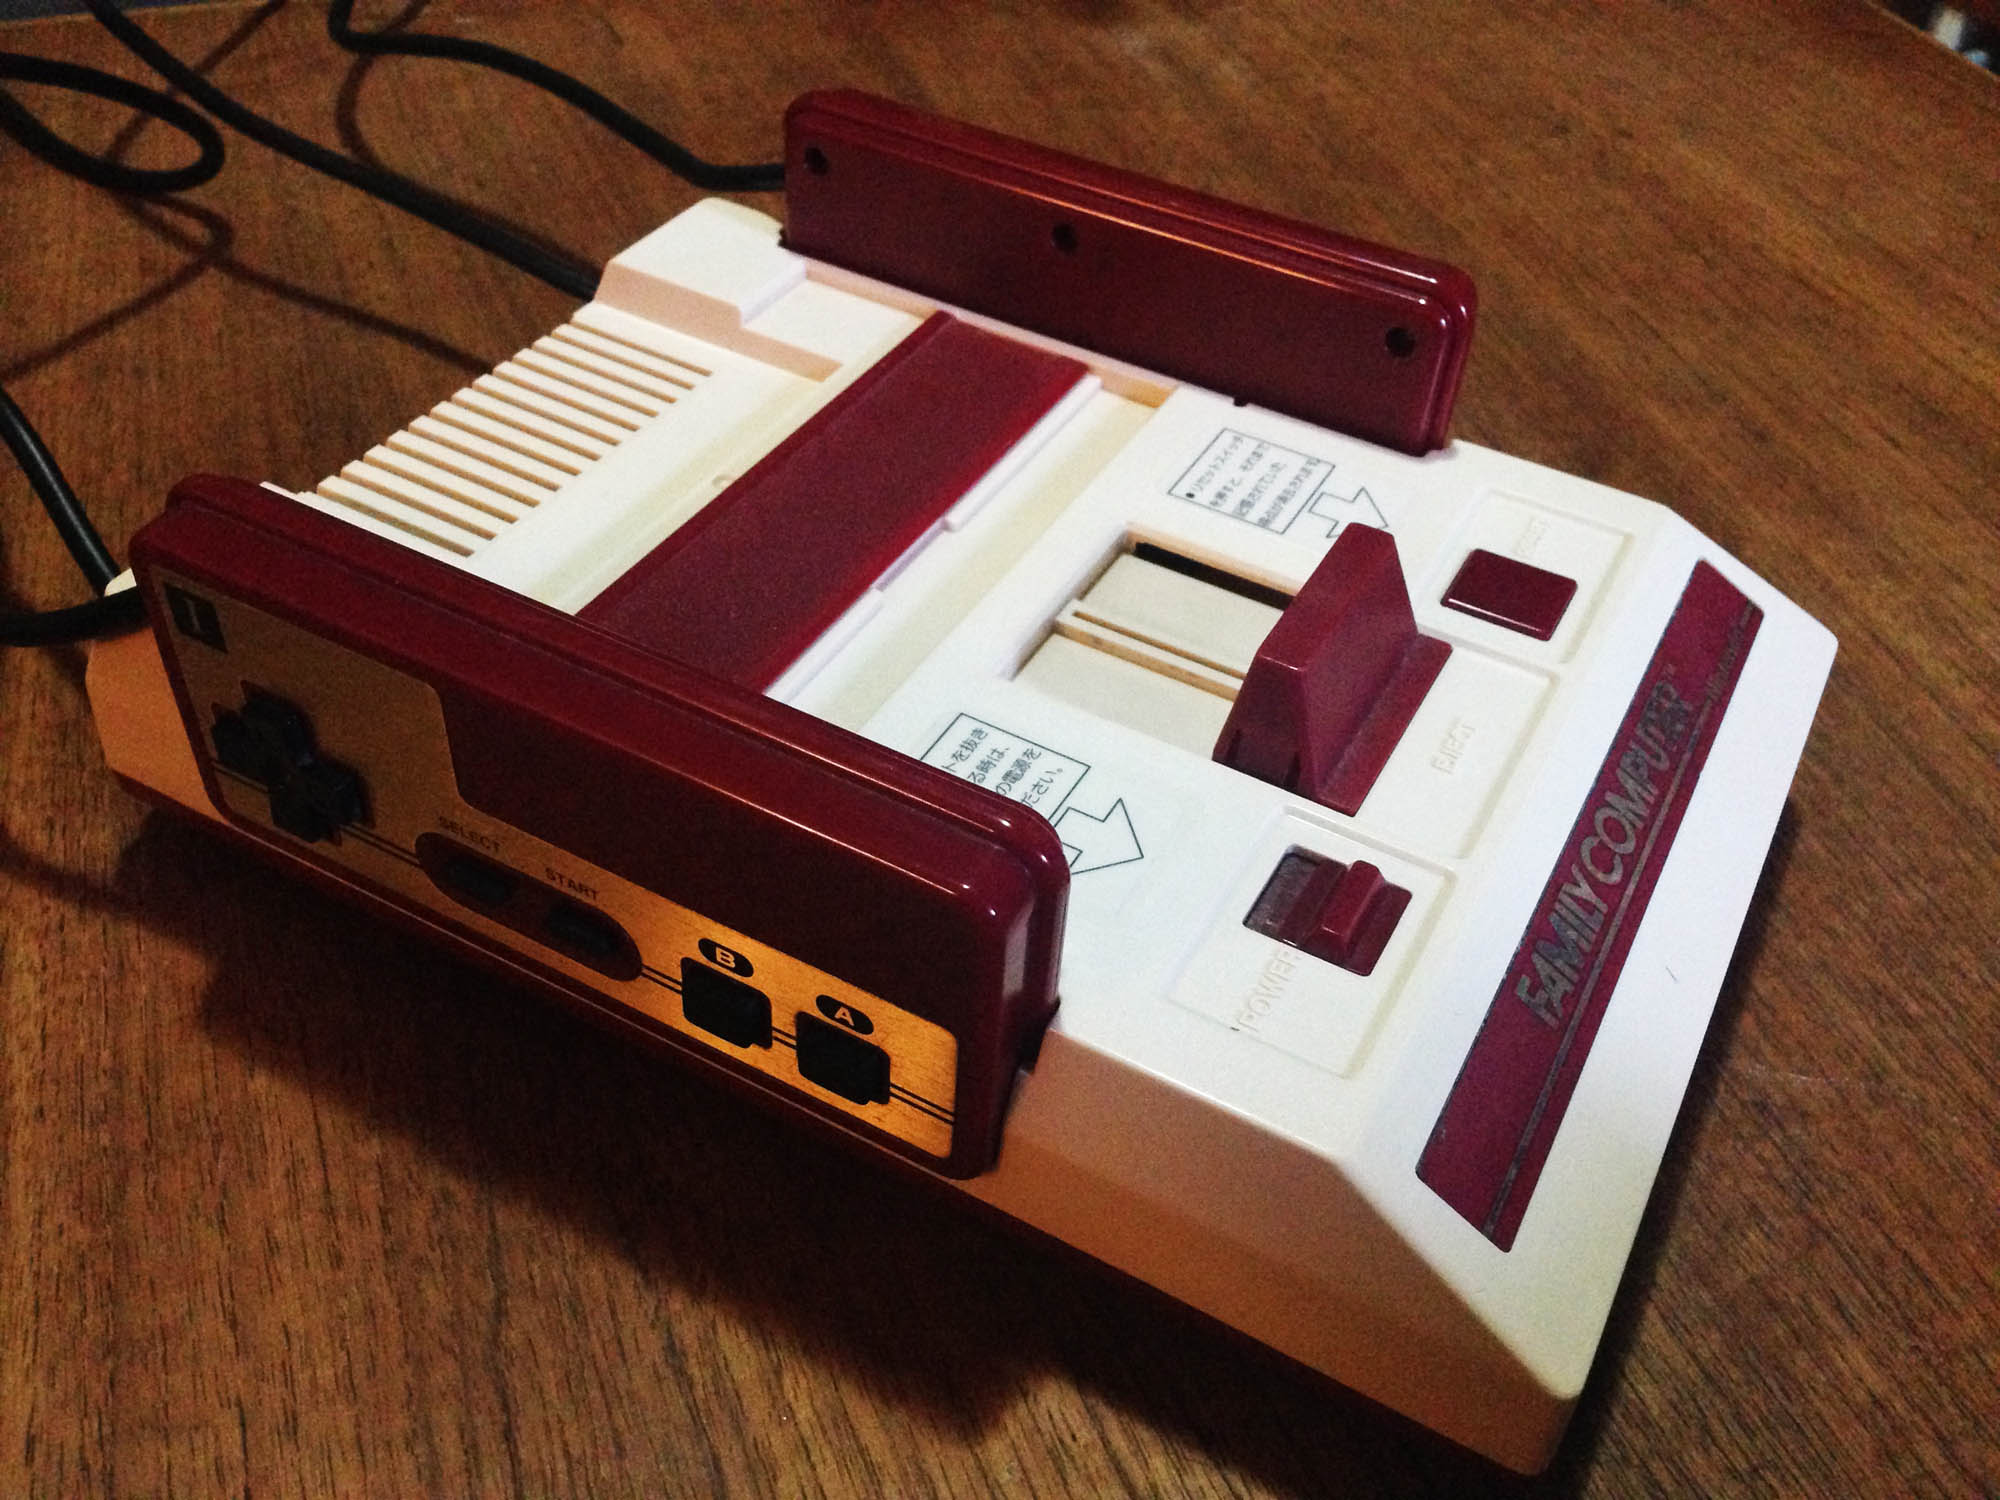
It obviously needed a good cleaning. For comparison here it was lined up with my restored square buttons Famicom.
But personally I think it’s best suited to playing Outrun – with FM audio – on the Mark III!
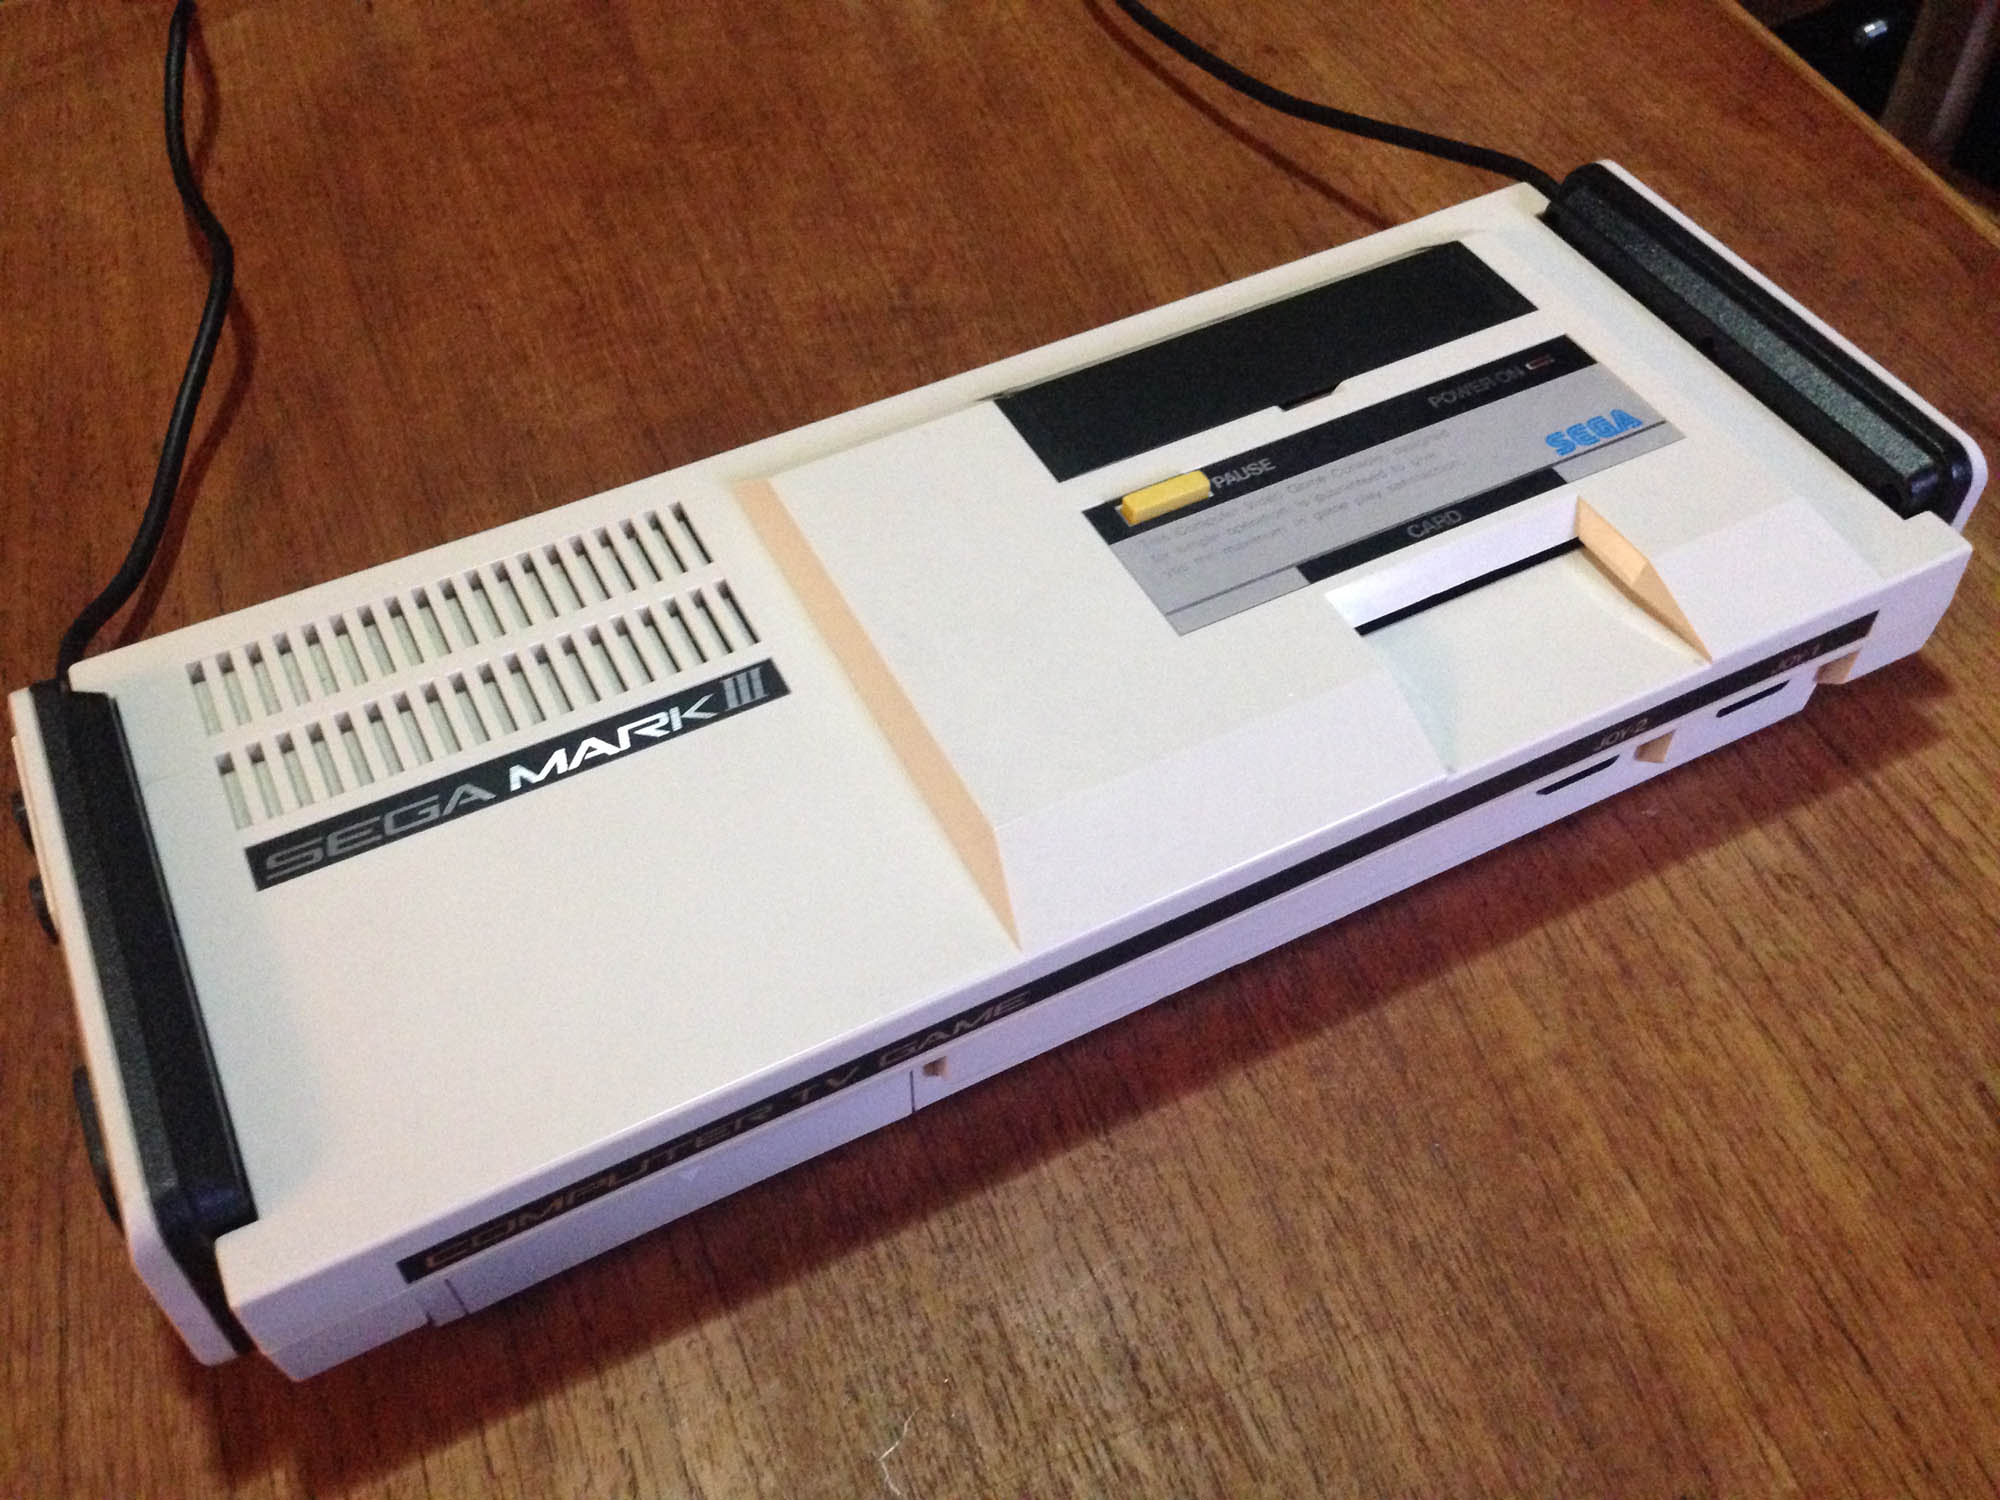
Mark III set up and ready to rock.
To be honest it’s slightly annoying to use, because Outrun requires you to hold one of the buttons to accelerate. But it oozes 80s charm, and this was the premium ‘Sega at home’ experience of the mid 80s.
I’m a great believer in game box protectors. With vintage games only getting older, anything that helps them (and their related paraphernalia) to stay in great condition without being fully archived is a great investment.
I recently got some box protectors for my Japanese Game Boy/Game Boy Color games. There are two sizes for Japanese Game Boy games, the original size which are very small, and a later size which is about 4/5 of the ‘standard’ Famicom box size. This later size continued through the Game Boy Color era too.
Previously I had stored my small Japanese Game Boy games in Japanese Game Boy Advance protectors, which were okay in one direction, but way too big in the other two.
Similarly, I kept my larger Japanese Game Boy games in Famicom box protectors, which was a closer fit but still quite a lot of room at the top.
It’s great to finally have my Game Boy games secure in snug fitting protectors.
Adaptations for less common sizes
I was glad to find these Japanese Game Boy sizes, as a good fit is important for protection. It’s hard (or impossible) to find decent box protectors for less common box sizes, so here are some adaptations of sizes designed for other purposes that I use. While usually not perfect, they are good enough for solid protection without too much internal movement.
Japanese Game Boy Advance size works very well for the ‘mid size’ Famicom boxes
Only a small amount of room to move.
Western Game Boy protectors obviously work perfectly for Virtual Boy boxes.
NES protectors work nearly perfectly for the large size Konami Famicom games.
The unique Gun Sight box is nearly an exact match for Euro NES size protectors.
Famicom protectors work okay for small SG1000 games. It’s not really the right size in any direction and is very tight, but protects okay.
Large SG1000 boxes are a perfect match for an older style ‘too big’ NES protector size I found.
And these new small Japanese GB work very well for Famicom Mini GBA games
And finally, I’ve recently tried Nintendo 64 cartridge protectors on my small box Famicom games.
The fit is not perfect, much like the SG1000 games in large box Famicom protectors, they’re too tight in thickness, but too large in other directions, so they fit, but are somewhat tight. Until there is a better option, it’s a decent solution.
Customs
I had customs done for all these SG1000/Mark III box sizes. It’s a fully one off for Alex Kidd BMX (it’s the only box of that size), but a few each for the two card game sizes and big box Mark III gold.
Unfortunately the producer of these customs has quit the business, so I’m on the lookout for a new producer, if anyone knows of one!
The SG1000 most likely did okay for itself all things considered, but in the wake of Nintendo’s superior (and much higher selling) Famicom offering, Sega pivoted to make their home console platform more Famicom-like.
While the eventual result was the upgraded Mark III console, the first fruits of this pivot were realised with the SG1000 II.
Essentially a repackaging of the original Sg1000, it is also a design link between the two generations of Sega consoles.
Like the Mark III (and Mega Drive) it features English text on the top of the console, explaining its purpose and function. This one is particularly cute and amusing.
Instead of the terrible SG1000 joystick, it now has Famicom-style controllers which attach at the back, and Famicom like controller docks on the side of the console (more on this in the controller rivalry article).
There were two revisions of the SG1000 II. One was a simple re-configuration of the original console, and the second featured major internal revisions – it consolidated several of the original chips (among them the ‘off-the-shelf’ Texas Instruments SN76489 sound chip and TMS9918 video chip) into one new custom Sega part. This later model is much closer to the circuit of the Mark III, and because of these changes can be modded to output an RGB signal.
Both console revisions look the same on the outside. Very late release SG1000 II consoles came with an updated controller, though it doesn’t seem this change lines up with the internal board revision changes.
The Sg1000 II is a somewhat redundant console from a collecting perspective. It lacks the ‘first Sega console’ cachet, but isn’t as useful as the upgraded, more compatible, more user-friendly Mark III.
And in terms of looks, the redesign is more modern but a bit plain. It lacks the nice simple ‘retro evolved’ vibe of the original, but doesn’t quite nail the ’80s futurism’ look that Sega perfected with the seriously stylish Mark III.
But I really like that Sega was developing their own unified design aesthetic, and so it does look pretty cool with this matching joystick.
Ninjas were everywhere in the 80s, and Japanese game developers were happy to fulfil the international demand for martial arts action. Nintendo’s console had Kung Fu, Ninja Gaiden, Ninja Turtles, The Legend of Kage, Shadow of the Ninja and many others. Sega had their Shinobi and Dragon Wang series, as well as their shortlived Ninja series.
Much like the Dragon Wang/Makai Retsudenseries, Sega’s Ninja series is a somewhat convoluted progression of the same basic game template over a couple of generations of hardware.
Ninja Princess/Sega Ninja – Arcade
Ninja Princess (released in the west as Sega Ninja) began as a Sega System 1 arcade game in 1985. It’s an overhead run-and-gun game, one of a batch released around that time, such as Capcom’s Commando and SNK’s Ikari Warriors. Swapping out a warzone and slow moving bullets for Sengoku-era Japan and throwing knives, Ninja Princess is one of the first ever examples of an action game with a female protagonist, a whole year before the highly celebrated Metroid.
The game stars titular princess Kurumi, whose castle has been overrun by bad guys. She escapes a kidnap attempt in a cute animated intro, and sets out to take back the castle with her ninja skills.
It’s a truly great example of the genre, with tight gameplay, great graphics and sounds, and some nice gimmicks. You have two fire buttons – one fires knives (or via a power-up, ninja stars) in the direction you are facing, and the other always fires directly up, no matter which way you are oriented. This innovation completely fixes the clunky feeling the genre can have, as you can actually fire at enemies while retreating. The third button activates a temporary ninja-vanish to evade enemy attacks.
On top of this, Ninja Princess mixes up the gameplay with gimmick/event stages, including a stage where you avoid falling boulders, another with stampeding horses, one set on logs floating on a river, and two stages where you climb castle walls.
The graphics are fantastic, especially for 1985, colourful, detailed and stylish, and Kurumi herself is a particularly cute and nicely designed sprite.
The original arcade version is available on the Saturn, included in the compilation package Sega Ages Memorial Selection Volume 2.
It has a slightly squashed aspect ratio to fit in the Saturn’s resolution (but with no detail loss), and the graphics have been slightly retouched, mostly for the better. But it is a great way to play the game. One of the menu options allows you to play with infinite lives, which is a godsend, as being an 80s arcade game, it’s brutally difficult in the later stages.
Ninja Princess (忍者プリンセス) – SG1000
Sega’s first contemporary home port was for the SG1000 in 1986. As you’d expect, the graphics have taken a fairly big hit, and with only two buttons the ‘ninja vanish’ function has been mapped to hitting both action buttons at once, but it’s otherwise as faithful a port as could really be possible on the hardware.
The event stages are gone, but otherwise pretty much the entire game is intact, including the climbing stages. It’s actually quite fun to see some of the set-pieces from the arcade re-created in a more primitive form, and while the enemy ninjas are mostly single colour sprites in this version, their single colour often matches the primary colour of that enemy type in the arcade – you can see the designers of the port really tried to make it resemble the original.
The dinky SG1000 graphics have their own charm, and assuming you’re using a decent controller it plays really well for an SG1000 game. In an attempt to prolong the life of the title for home gamers, it introduces a ‘secret scroll’ system, and you have to collect all the secret scrolls to access the last level. They’re basically randomly located in the levels, so this is probably the most frustrating part.
While it had no chance of living up to the arcade original, it’s still very fun, and is one of the best games for the SG1000.
Ninja Princess 1 Mega Han (忍者プリンセス1メガ版) – Mark III
When Ninja Princess finally made it to hardware that could do it full justice – in the form of Sega’s newer Mark III console – it was ostensibly in the form of a sequel. Ninja Princess 1 Mega Han.
In what was assumedly an attempt to make the game more ‘serious’ (and perhaps appeal to console gaming’s primarily young male audience), the graphical style has been changed completely, removing any hint of the original game’s cutesyness. And instead of starring Kurumi the Ninja Princess, it stars a goofy looking dude named Kazamaru, who now must save the princess.
I wonder if Archie and Veronica will like my outfit?
Despite the long-winded title on the box, the title screen shows simply ‘The Ninja’.
It’s set up as a sequel story-wise, but is actually another, more faithful, port of the arcade game. All the arcade event stages are back (in re-drawn form), including the falling boulders, stampeding horses, and river. Controls are identical and the scroll system is back from Ninja Princess SG1000, so you have to collect all five scrolls, then perform a particular task at a particular place to access the secret basement level and rescue the princess. There is also a new speed power up scroll.
It plays about as well as the arcade, but the new graphics are kind of badly drawn (especially the main sprites, including Kazamaru who looks as awkward in-game as he does on the cover), and the limited cartridge space meant there is much less detail and animation than the arcade game. Apart from the odd nicely drawn section, it’s not a particularly good looking Mark III game. There are more musical tracks, but they’re pretty bland, especially when your knives are powered up to ninja stars and you hear the same tune over and over.
The Ninja – Master System
Another Master System cover art ‘masterpiece’
Ninja Princess 1 Mega Han was released in the west under its title screen name The Ninja. While many Mark III/Master System games contain a universal ROM with both English and Japanese versions of the game onboard, The Ninja was actually ‘upgraded’ for its release outside of Japan. The western release gets a scrolling text intro, a new title screen, and an extra image on the splash screen when you collect all the scrolls.
Unfortunately the entire second level is missing, no doubt sacrificed to make space for the above. Which is a shame because it’s actually one of the better looking levels. Two of the secret scrolls have also changed location, one in particular makes a heck of a lot more sense in its Mark III location.
No village level for you, US/PAL Kazamaru!
And here the Ninja series ended. One fantastic arcade game, a very good SG1000 game, and a decent-but-nothing-special Mark III game. They’re worth a play through, but probably the best experience of the series is to be had on the Saturn port of the arcade game.
Two new consoles have been released by two prominent Japanese arcade developers – the Family Computer from Nintendo, and the SG1000 from Sega.
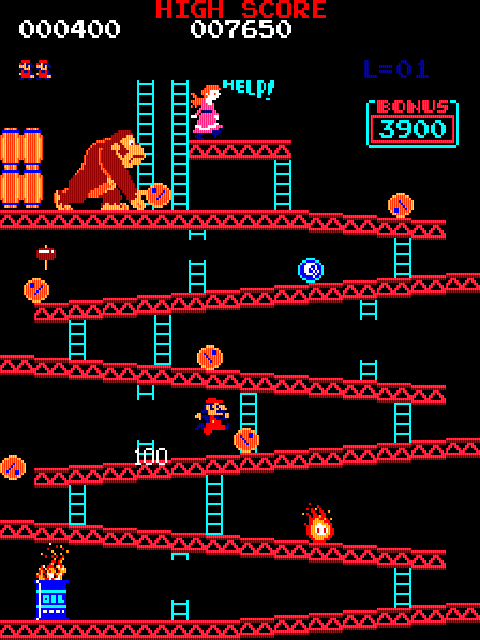
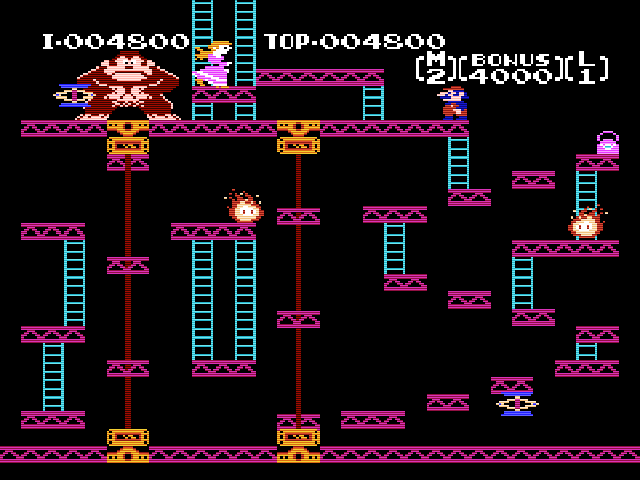
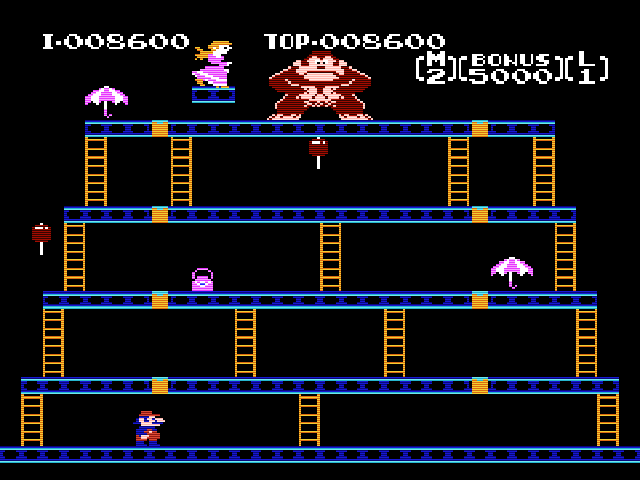
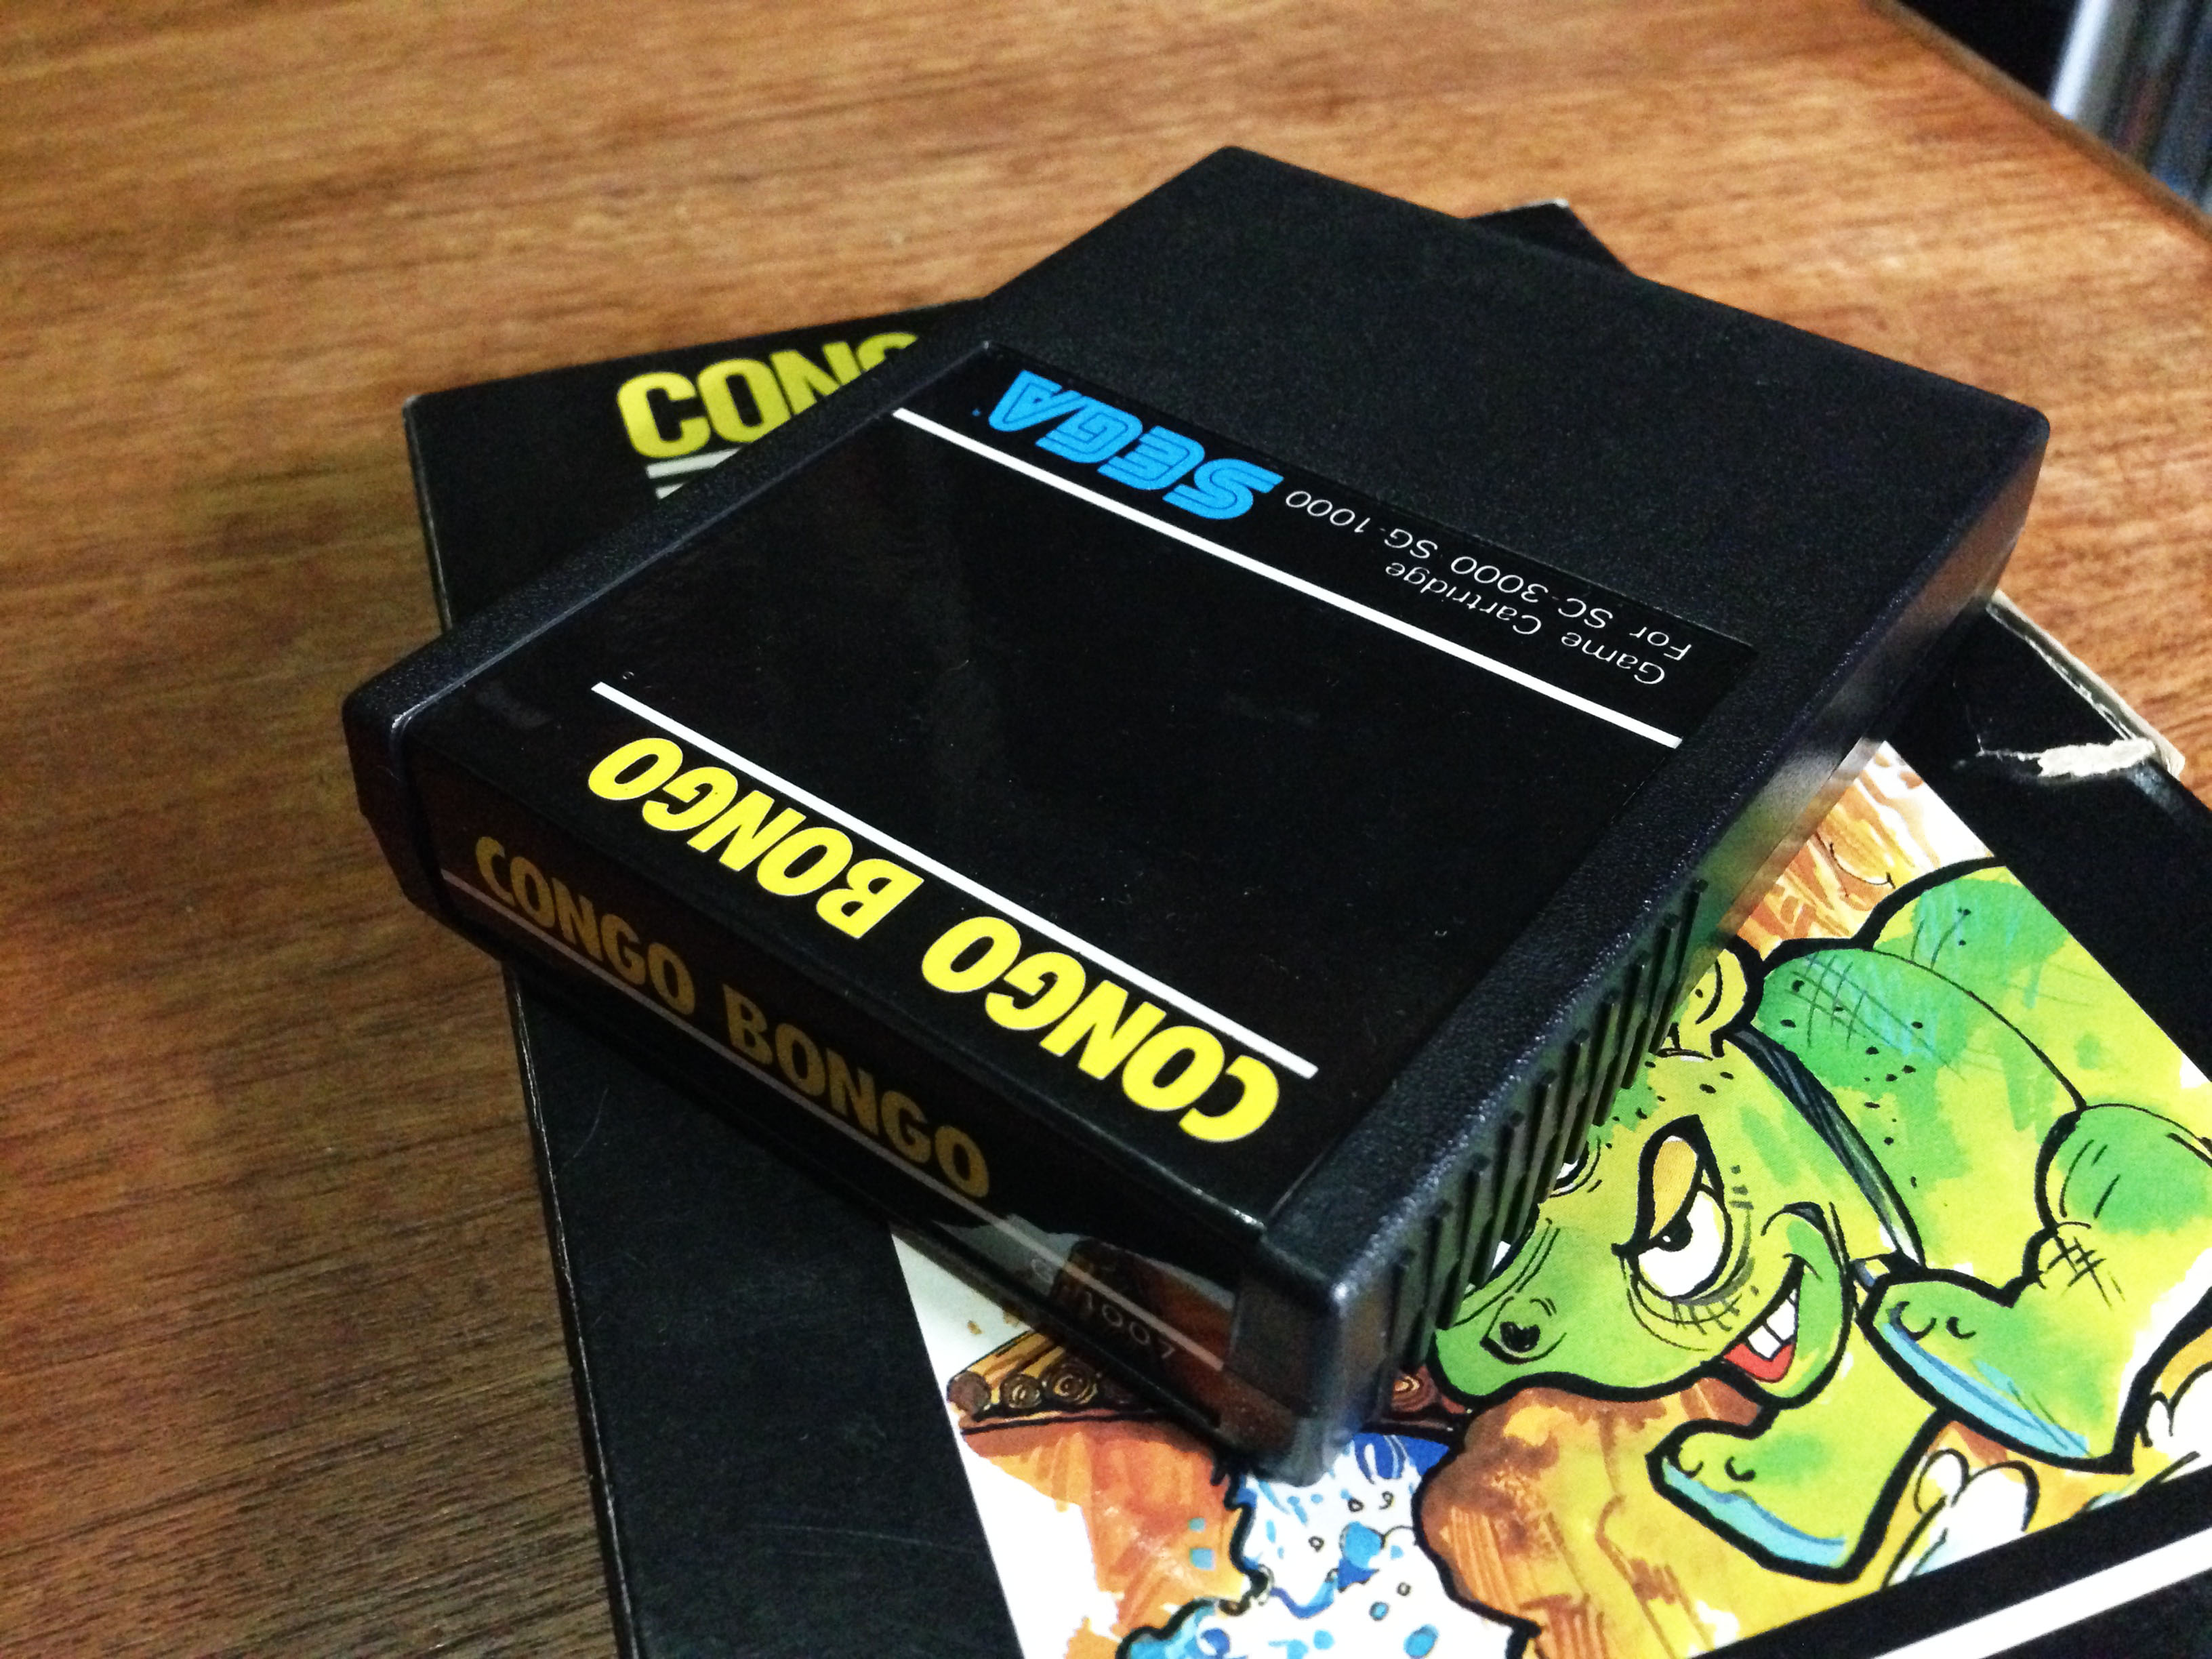
The big game in the arcades is still Nintendo’s Donkey Kong, featuring future superstar-to-be Mario. But the bigger name in arcades right now is Sega, whose Turbo and Buck Rogers: Planet of Zoom are doing incredible things graphically. And Sega now have themselves an answer to Donkey Kong – Congo Bongo. Essentially a conceptual clone of Donkey Kong (and in the later stages Konami’s Frogger), Congo Bongo differentiates itself with an innovative and incredibly impressive isometric 3D perspective.
In turn, both companies’ new consoles have launched with home ports of these killer titles.
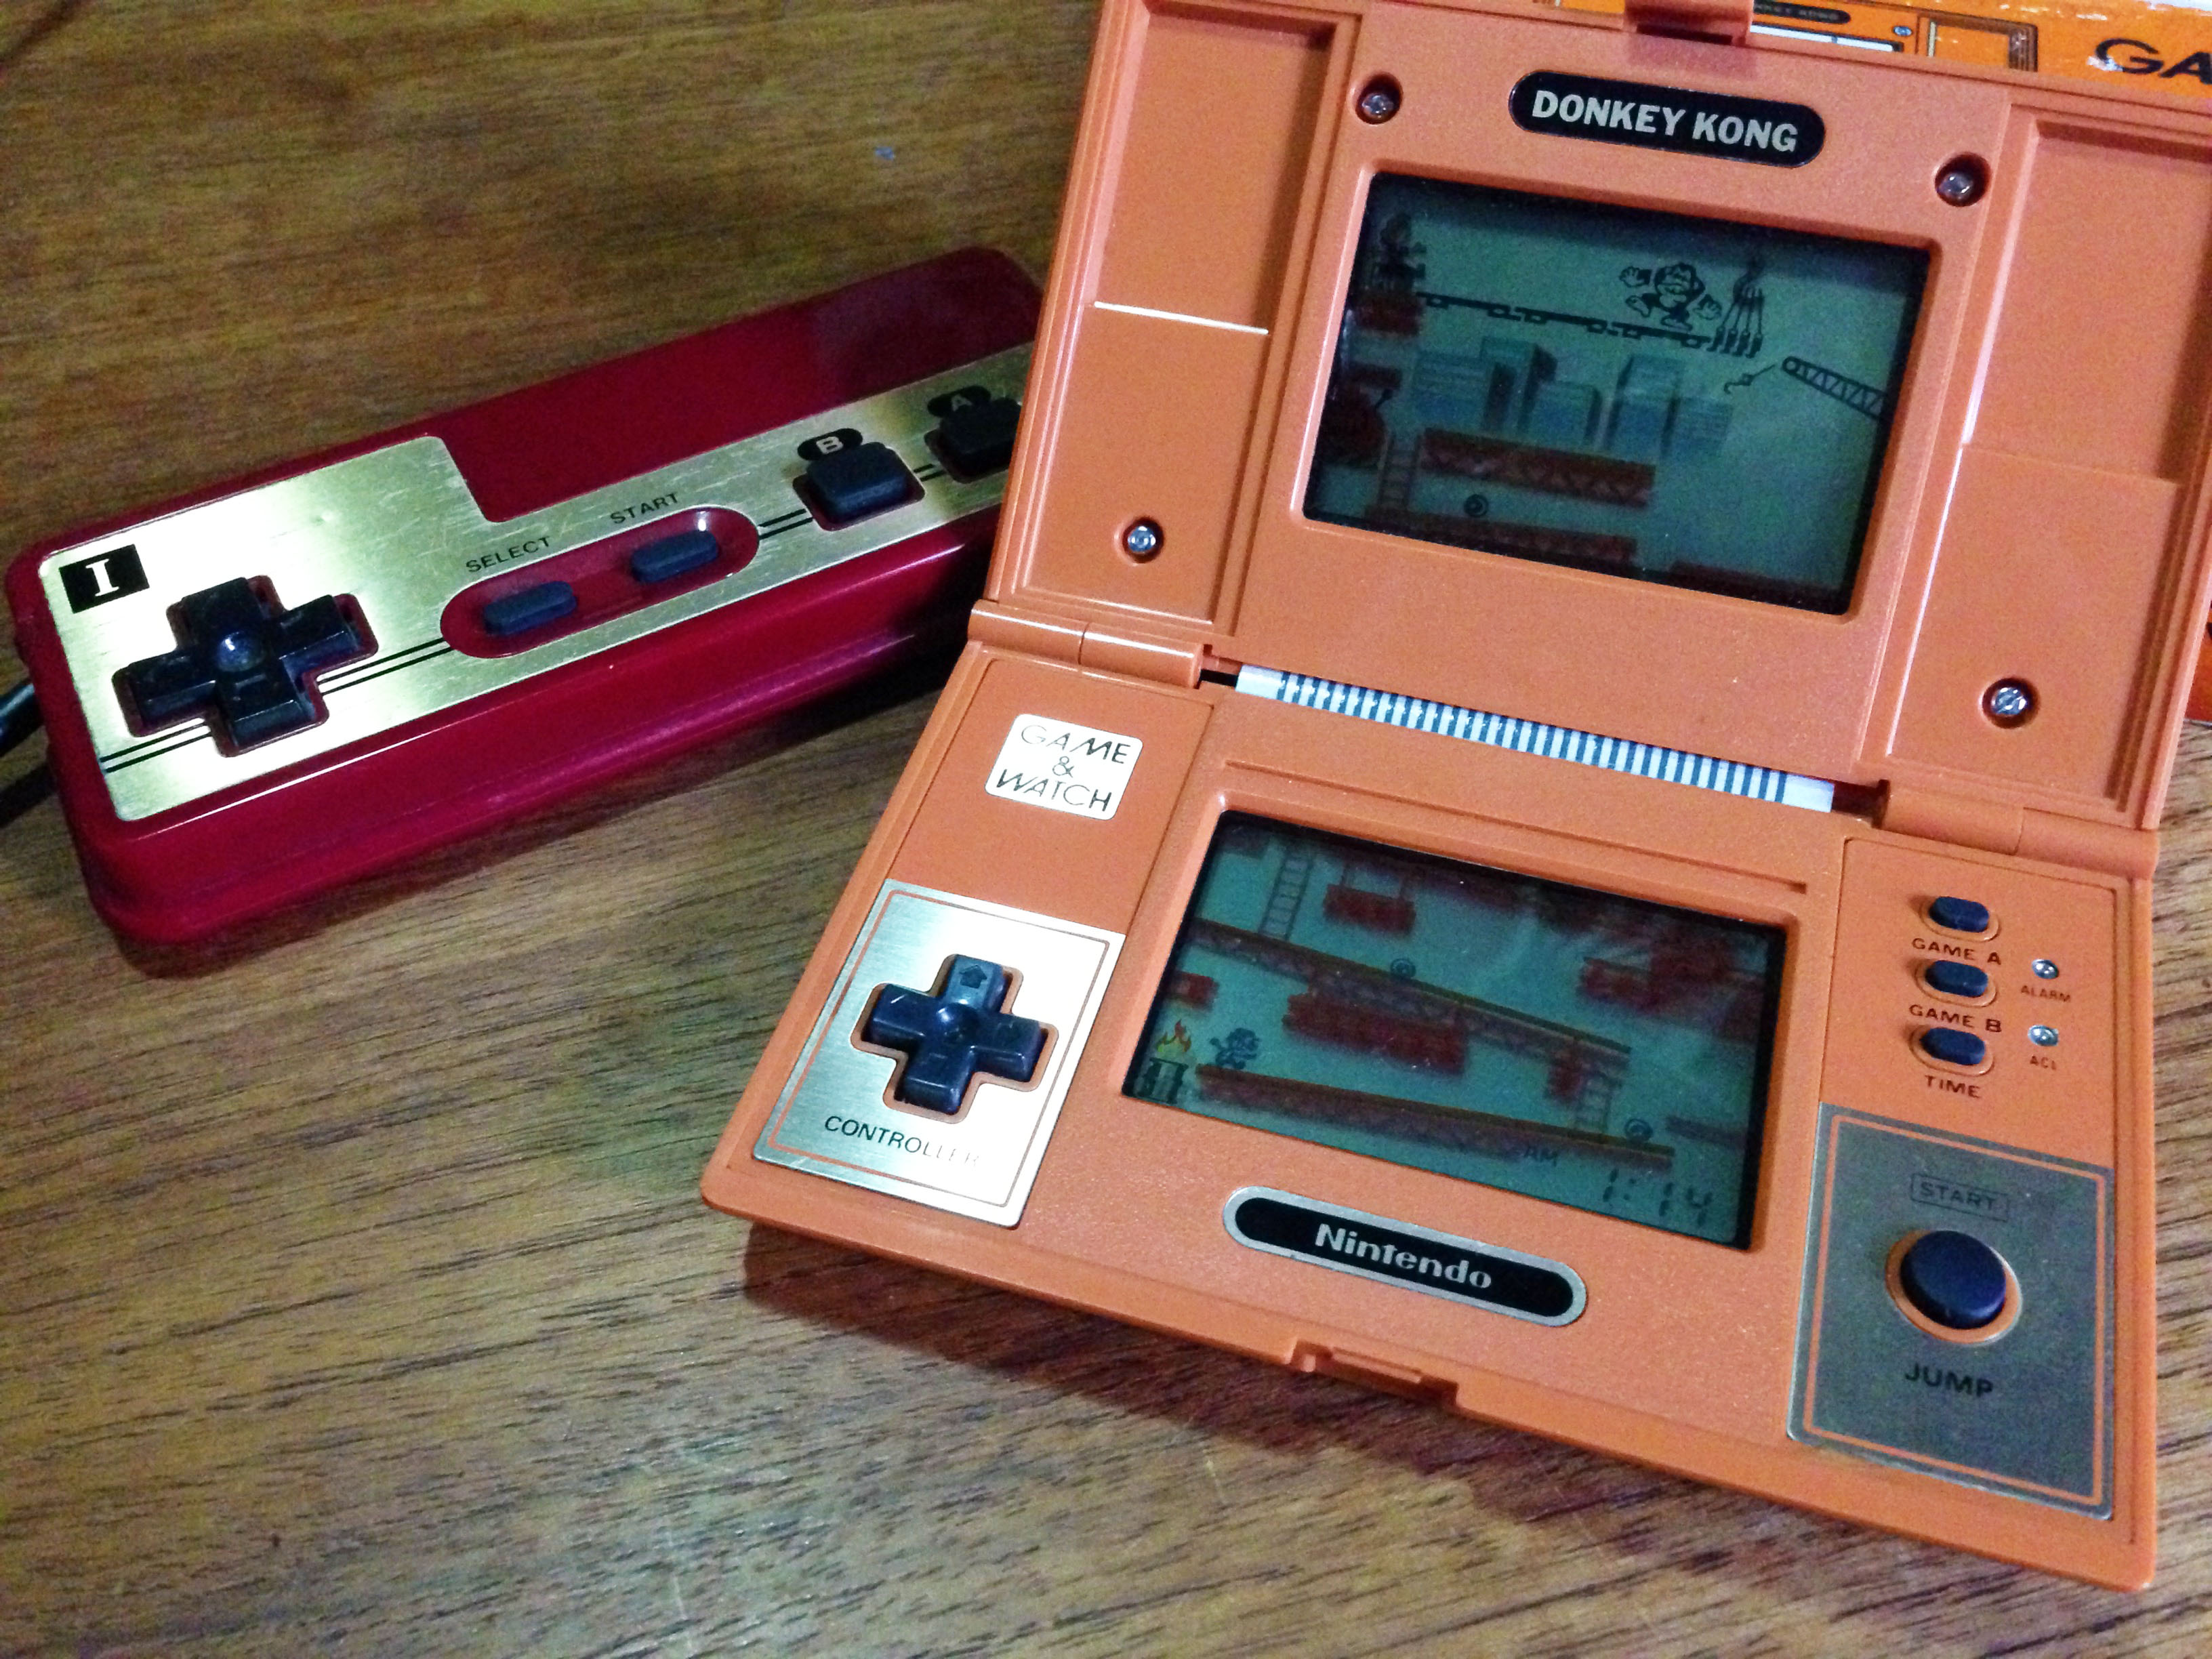
Of course, this isn’t the first time Donkey Kong has been made available at home. Aside from a variety of home console ports (including the solid Colecovision version), there is the fantastic Donkey Kong Game & Watch from Nintendo’s smash hit line of handhelds. The Family Computer itself has taken many design and packaging cues from the little handhelds, and this, along with Nintendo’s earlier Color TV Game series has given them valuable experience in the retail space.
So how do the two ports hold up compared to their arcade originals? Sega is taking the lead in the arcades, but are they up to the task of meeting Nintendo’s challenge in the home space?
Donkey Kong
First up is the original. Firing up DK on the Famicom, the first thing that’s apparent is that the game has transitioned quite well from the arcade’s 3:4 aspect ratio to the regular television 4:3 aspect ratio.
It’s a little squished, but overall it works and is a very faithful port. Gameplay is replicated near perfectly, if anything it plays more smoothly, though it may have to do with the Famicom controller being more suitable for platformers than arcade joysticks.
The ‘secret’ safe spot to avoid the spring
The major omission is the third ‘cement factory’ stage, so DK on Fami has only three stages before looping.
There’s even the ending screen where Mario is reunited with Pauline (briefly).
The arcade intro and interludes are missing, and there are a few sound effect and animation omisions, but it looks and sounds great overall. It’s a clear step above the already excellent Colecovision version, and Donkey Kong on Famicom is likely the most advanced game available on any home platform to date.
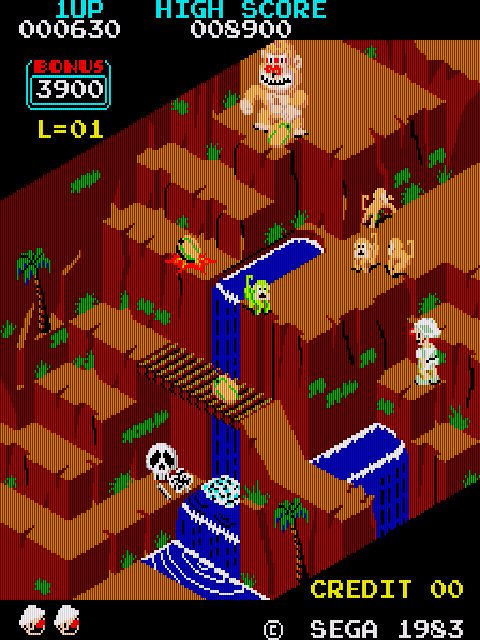
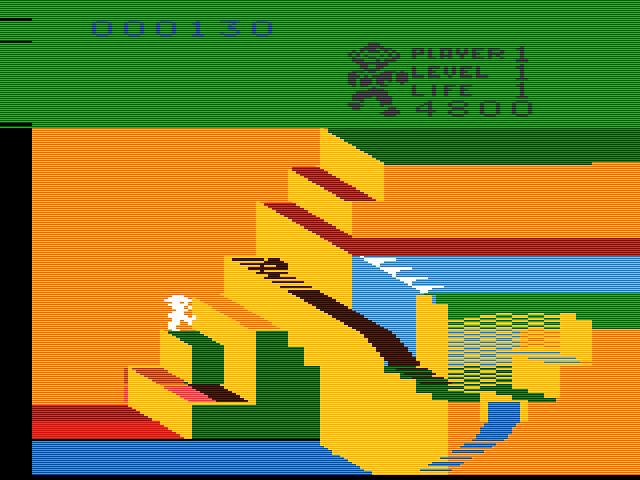
Congo Bongo
Congo Bongo has a very interesting history, directly linked with Donkey Kong. It was developed for Sega by a software engineering company called Ikegami Tsushinki – the same team that did the programming work for Donkey Kong. While Donkey Kong was designed by Shigeru Miyamoto, Nintendo assumedly didn’t yet have the software development pipeline to make a top arcade game in 1981, and hired external software engineers. Sega grabbed the same team for their answer to Nintendo’s smash hit.
As soon as you hit start on Congo Bongo‘s title screen, the disappointment begins. Where is the isometric 3D? As a 2D game Congo Bongo is very much a poor man’s Donkey Kong.
What’s even more disappointing is that the Colecovision, a console with basically identical hardware to the SG1000, managed to have a port which maintained the isometric perspective.
The Colecovision version is very impressive
And unbelievably, a port to the ancient Atari VCS somehow did too!
This should not work but it somehow does…
But the poor SG1000 got a 2D version. There are only two stages, the Donkey Kong style stage plays from a side view, and the Frogger style stage from the top.
Despite all this, it still plays okay, if a little awkwardly, and in the grand scheme of things it’s not too far below the Famicom version of Donkey Kong. It’s not helped by the terrible SG1000 joystick, but even if you get around that by playing on an SG1000 II pad, controls are a bit loose.
I’ll take the one on the left please.
The SG1000 hardware could have done much better, and Sega proved it in 1985 when their isometric 3D shooter Zaxxon (which was also programmed by Ikegami Tsushinki and used the same arcade hardware) was ported to SG1000 with the 3D effect intact.
…
It’s little wonder the Family Computer took off. Donkey Kong was a premium product. Congo Bongo for SG1000 is decent enough fun and about as good as most games before that point, but is just an interesting artefact now.
So you want to play some SG-1000 games old-school style…
…but the original SJ-200 joystick controller is a complete nightmare to use…
Sure, there’s a plug on the right for player 2 which can use any DB9 connector Sega pad, but player 1 is stuck with the SJ-200 tethered to the console.
Sega acknowledged their first controller sucked, and released a small modification/adapter called the JC-100, which allowed original console owners to to use the new pads released alongside the SG-1000 II.
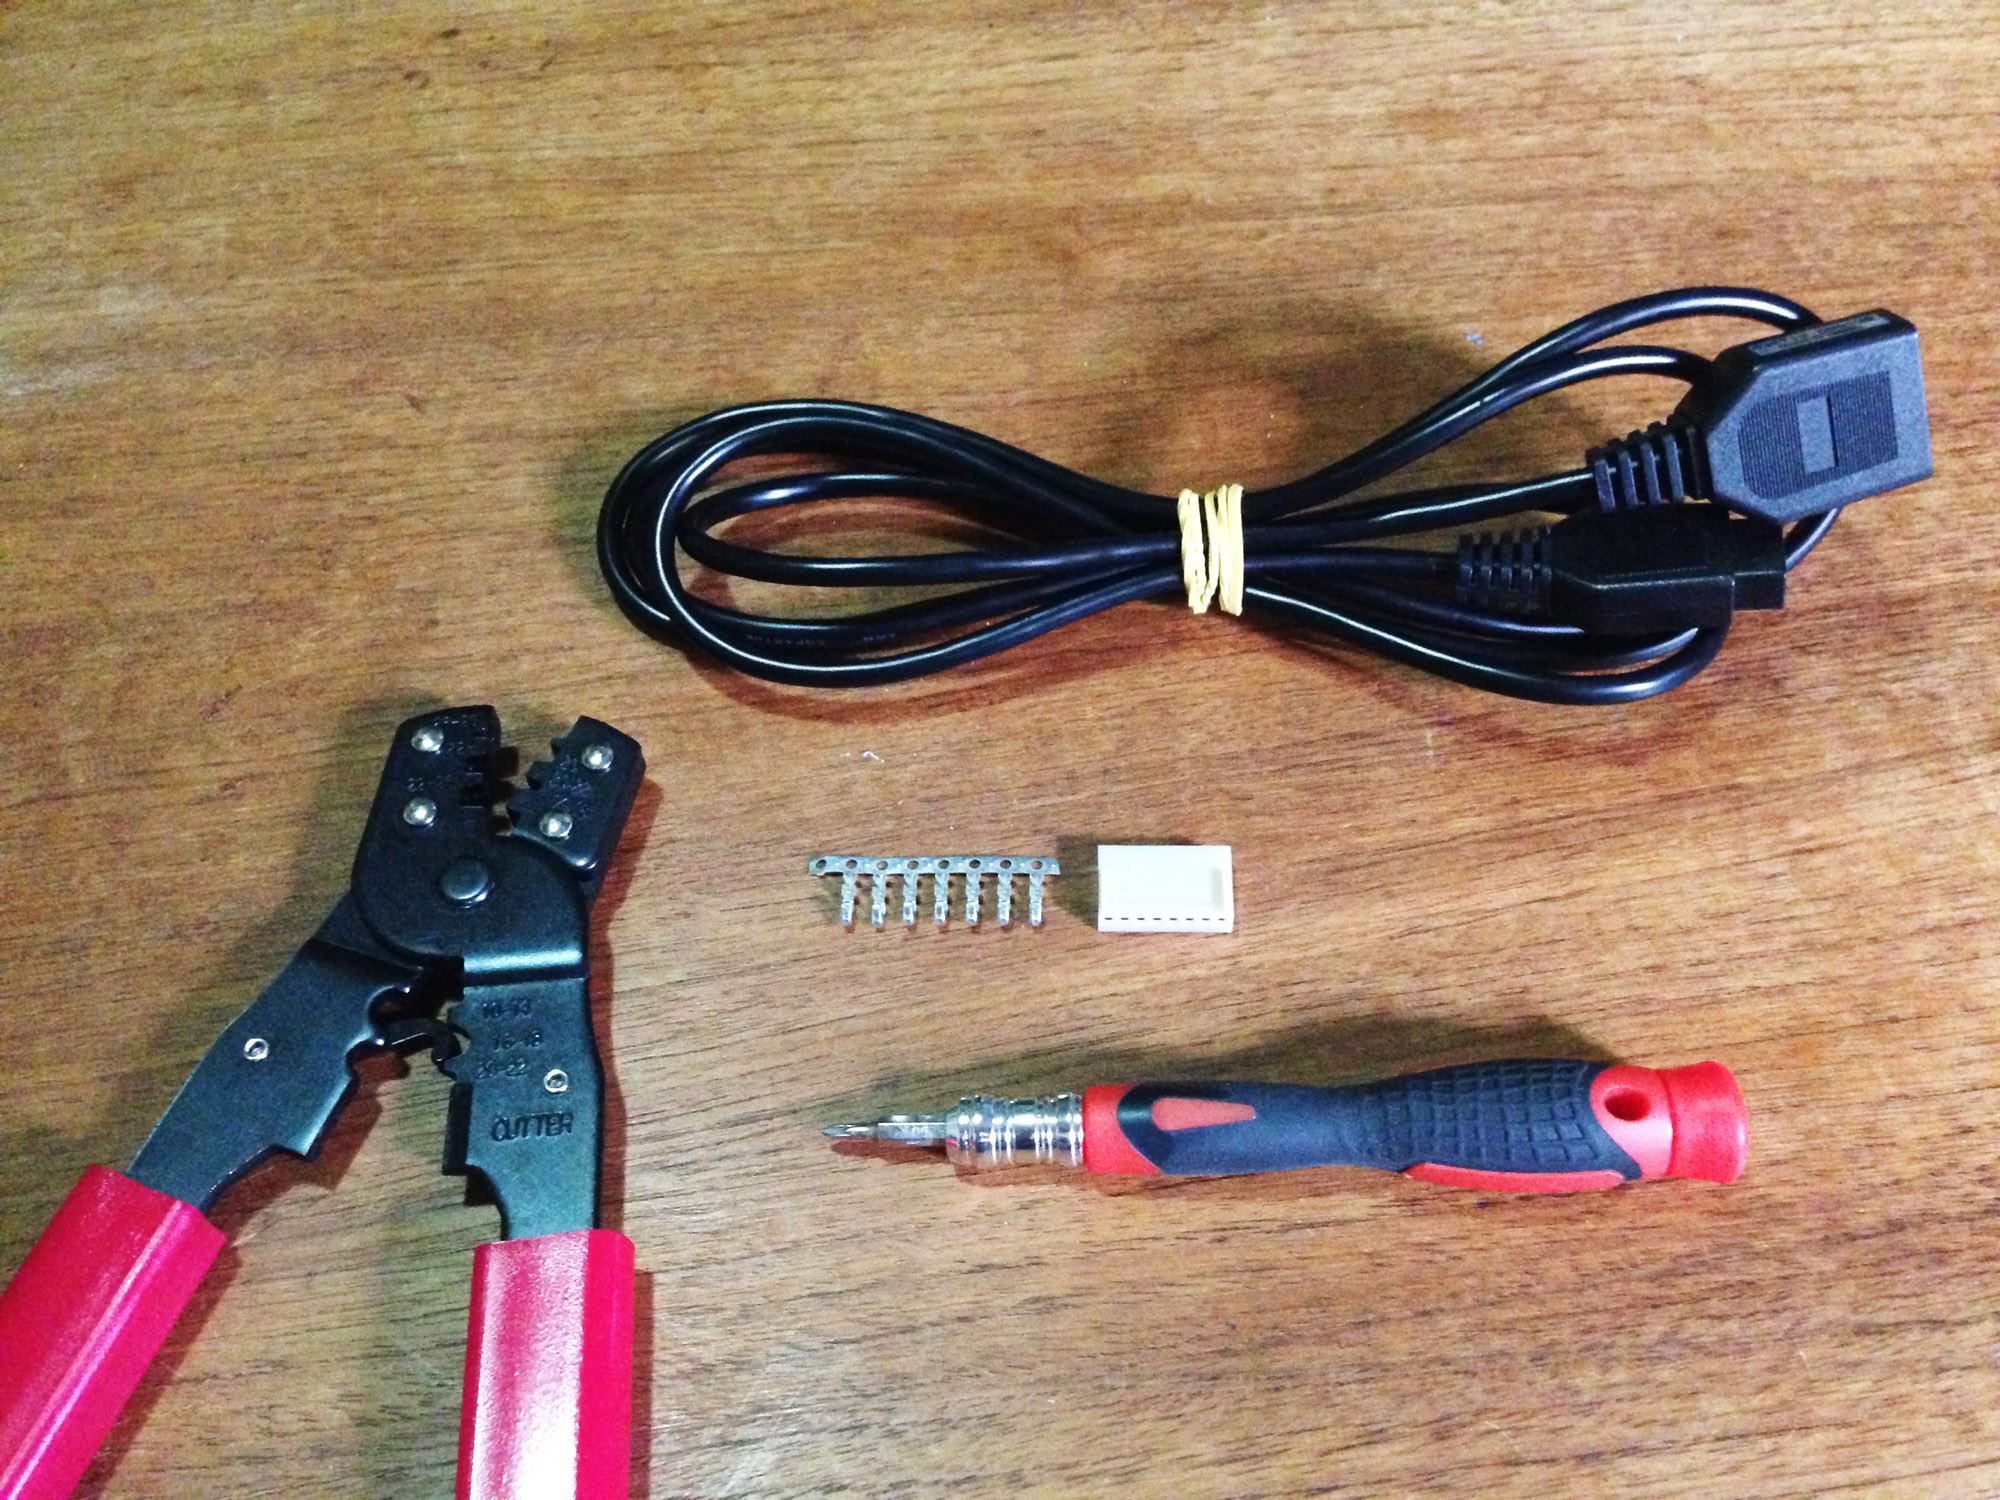
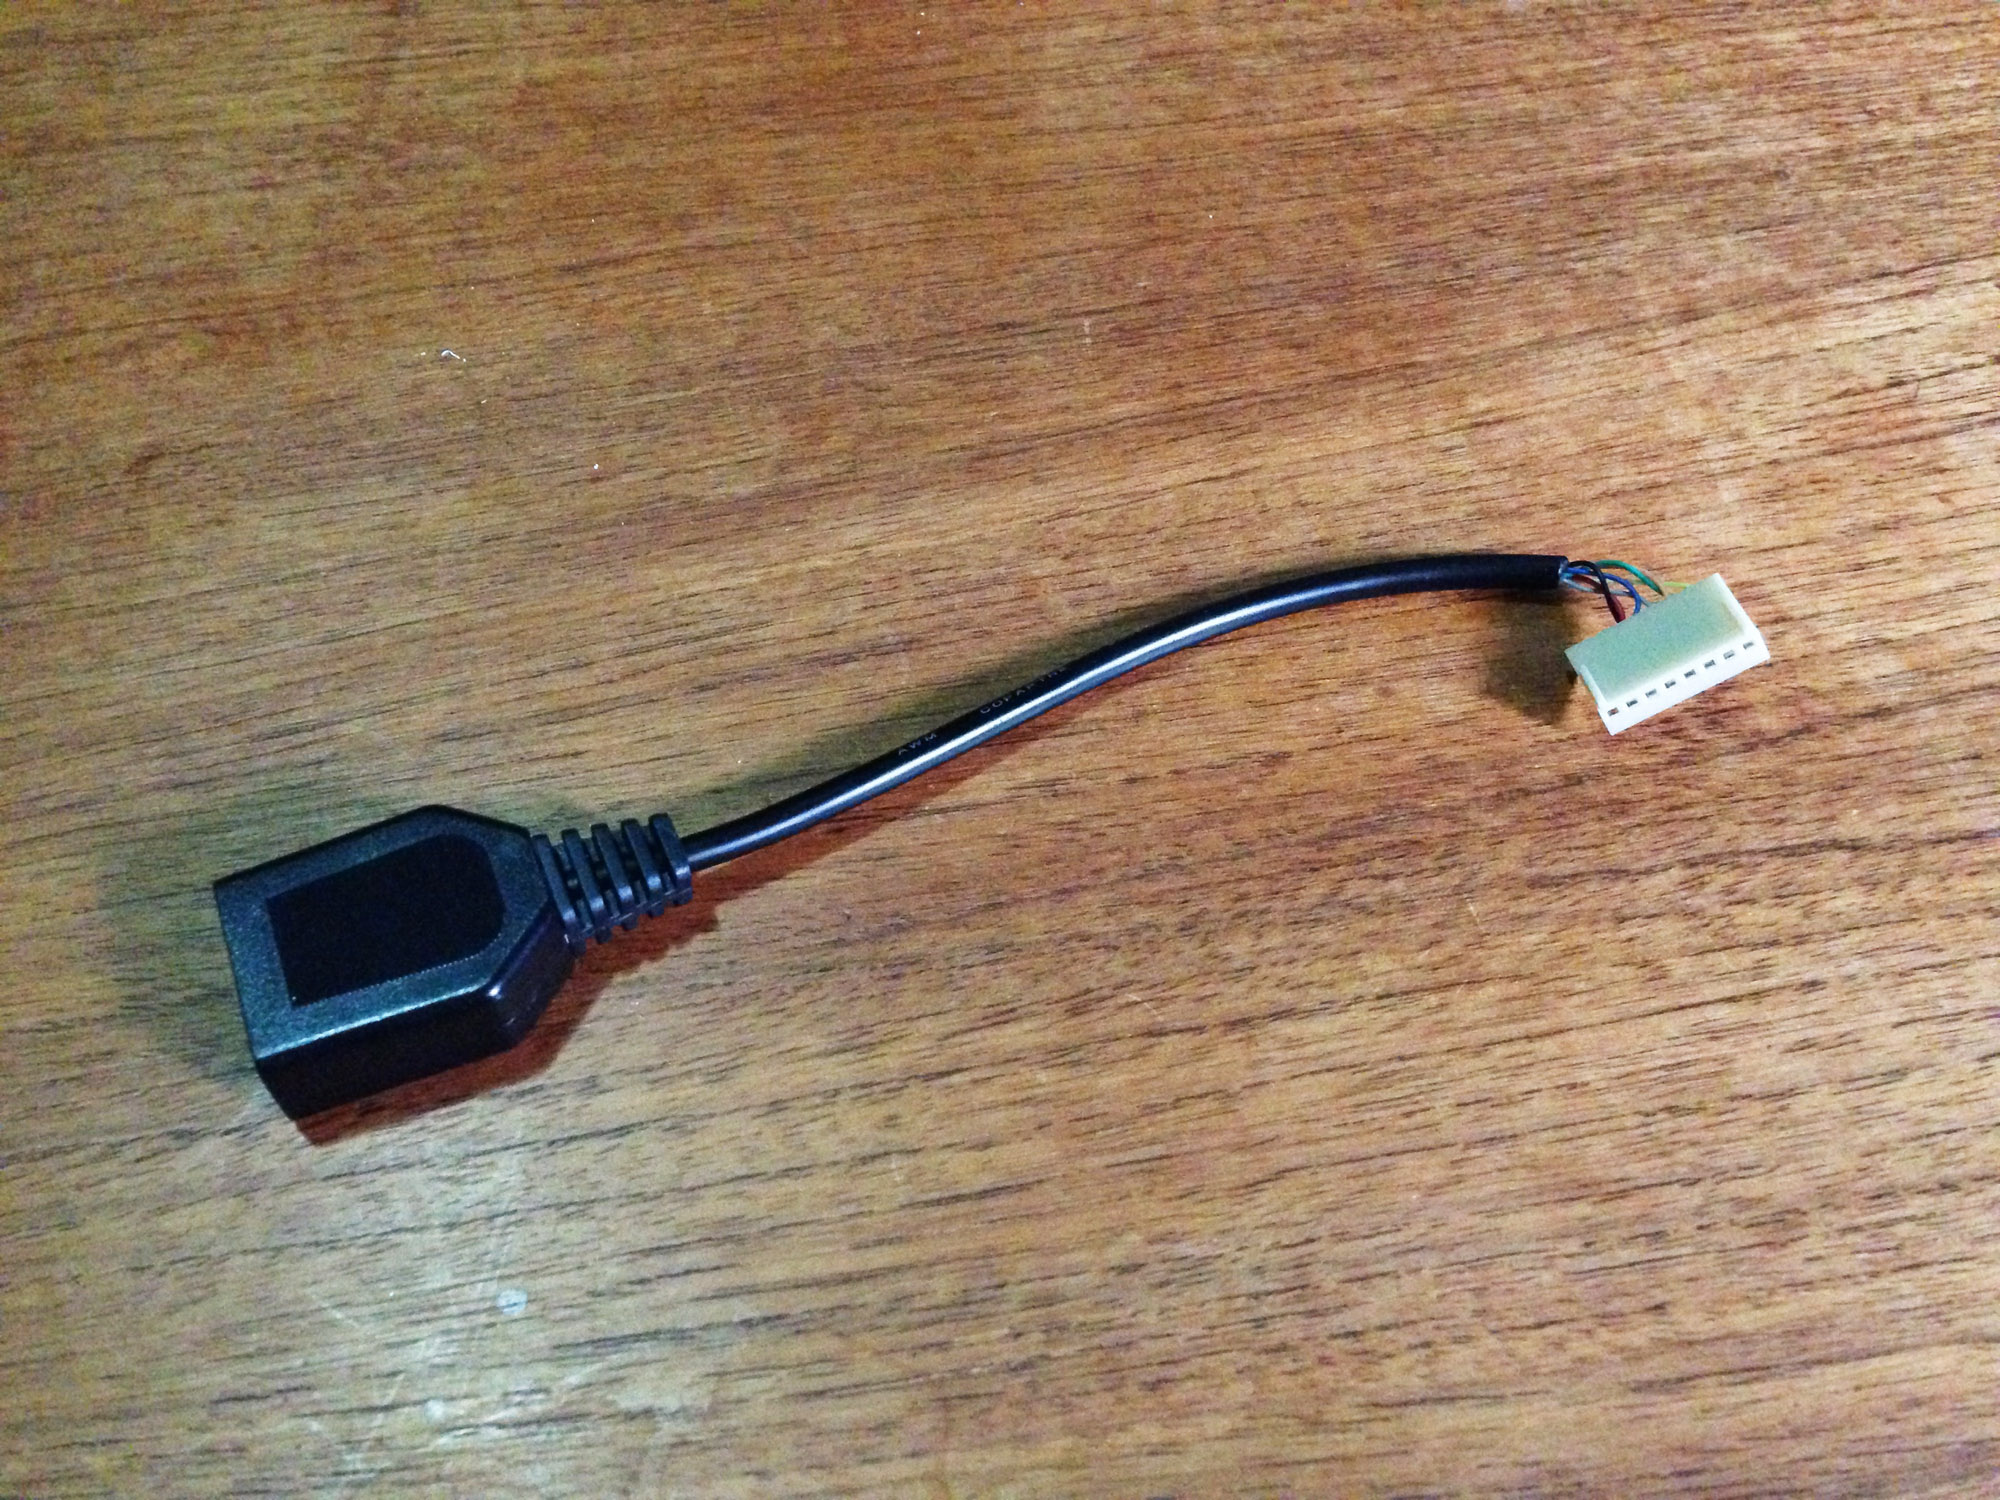
It would be impossible to get hold of a JC-100 now, but you can easily make one yourself. All you need are the following:
Mega Drive/Master System extension cable
Header plug with crimp connectors with correct spacing and at least seven pins – I’m using a pretty standard eight pin
Crimp tool
Phillips head screwdriver
First up open up the console (only four screws) and you can see the controller is removable, plugged in via a PC-like seven pin adapter.
The way DB9 controllers work is to ground a line corresponding to a button when pressed, so there’s a whole line for each button/direction, plus ground. The pins are handily numbered, and align to the following:
Button 1
Button 2
Right
Left
Down
Up
Ground
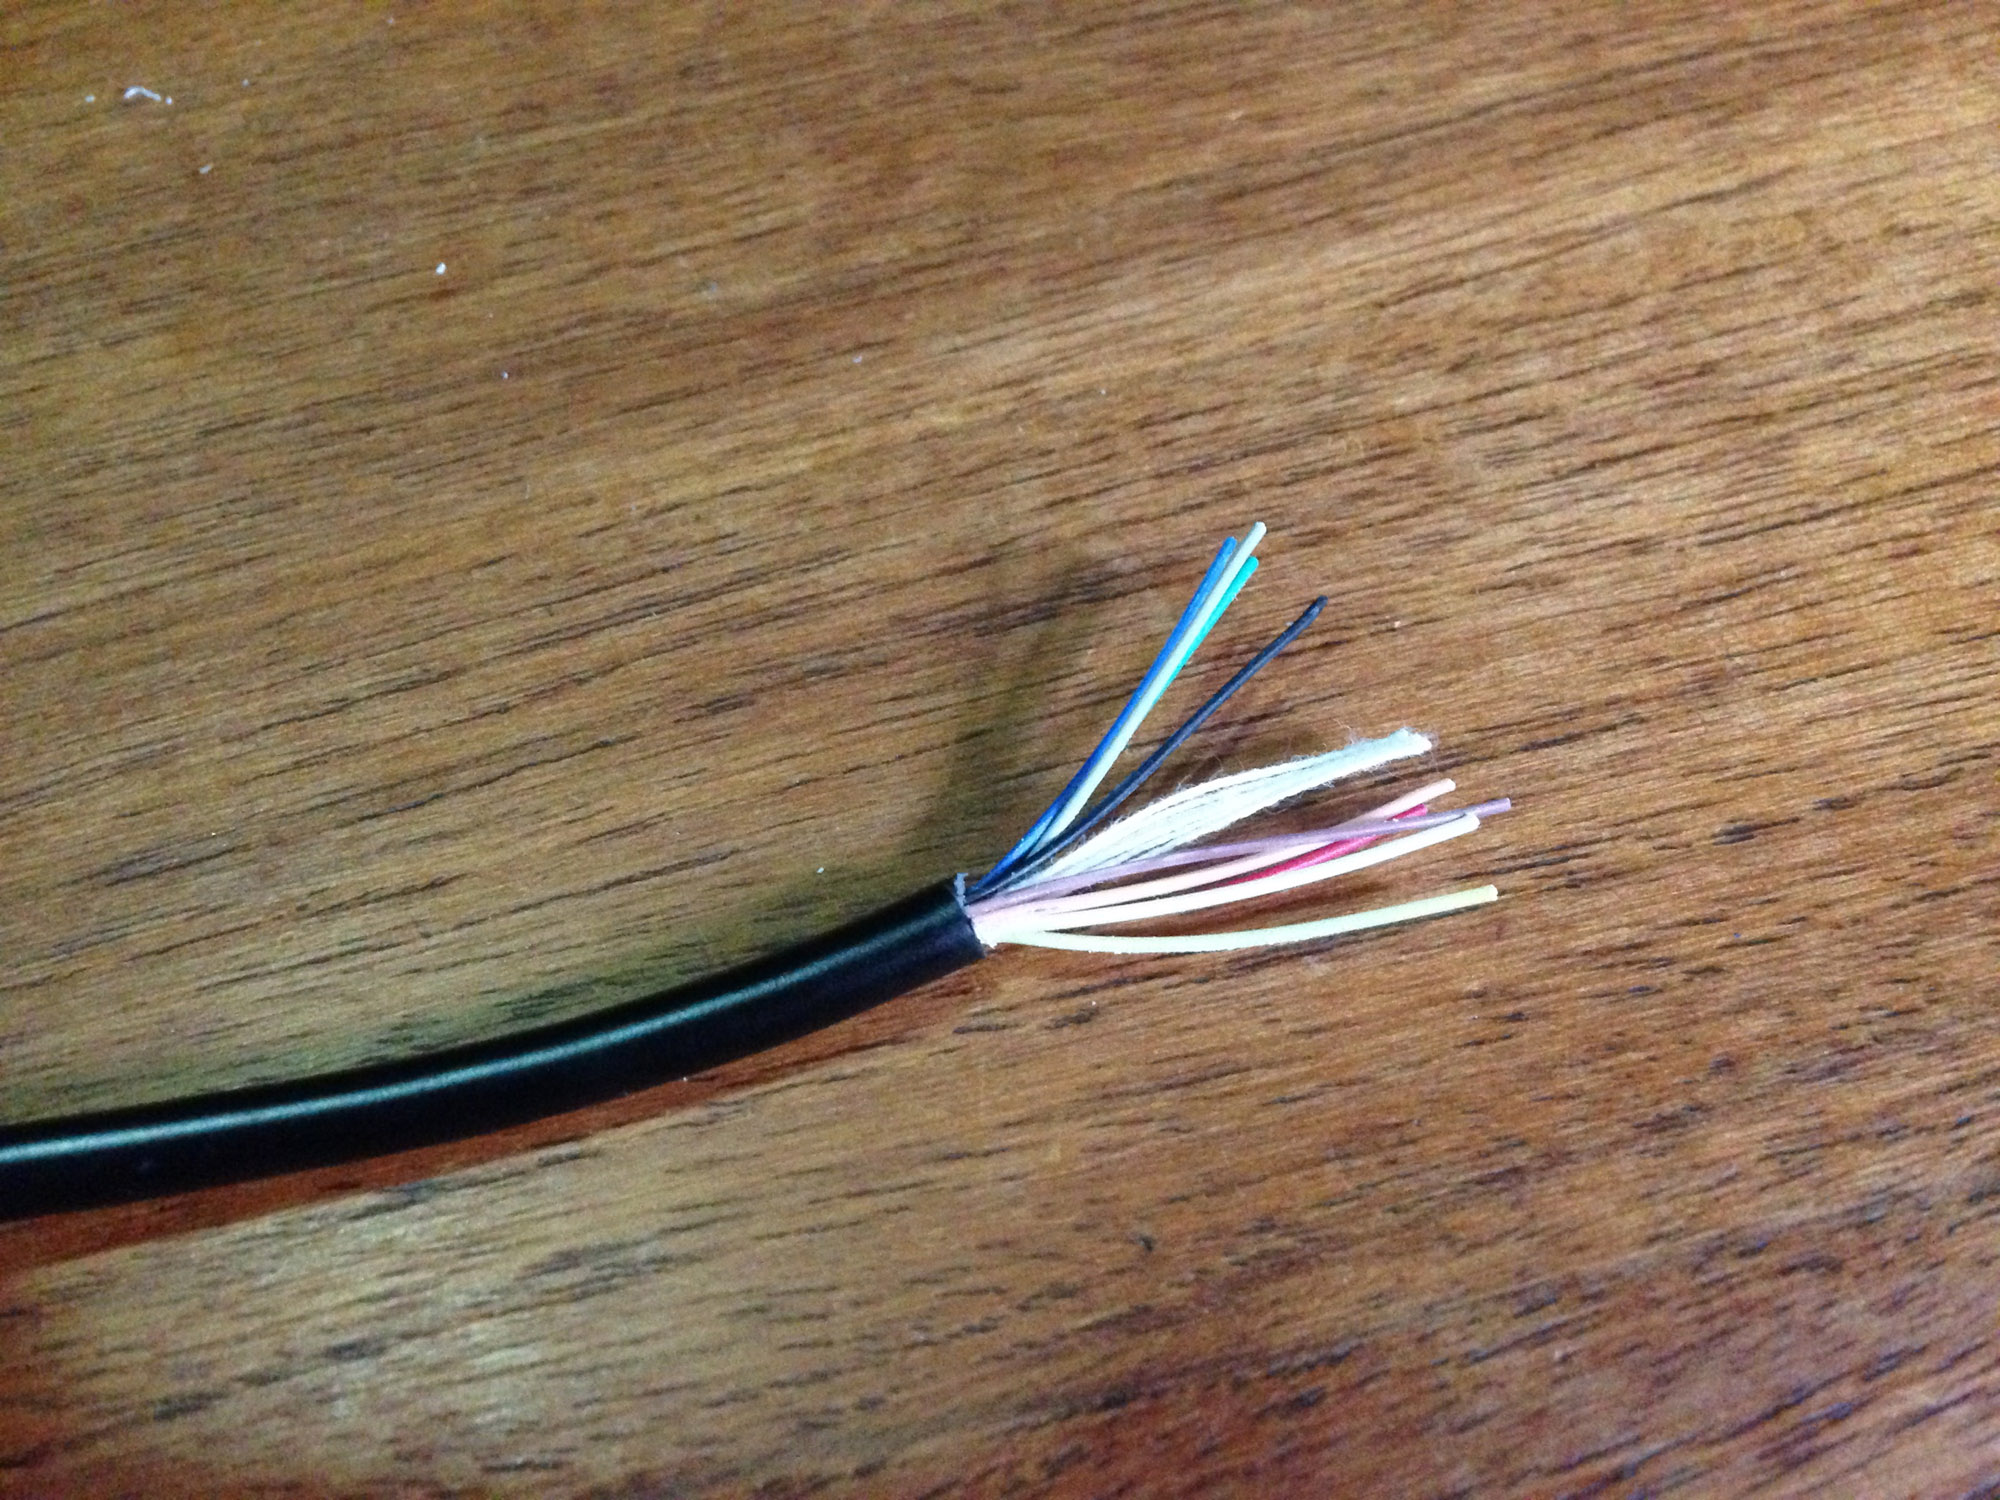
To make the adapter, start by slicing the extension cable at whatever length you like, then stripping the cover and the end of each wire. The internal insulation cotton can also be removed.
You’ll need to do some tests to see which wire is which, as in my case they wire colours did not line up to the colours of the original controller wires. In mine the colours lined up to:
Blue – Ground
Red – Up
Black – Down
Grey – Left
Pink – Right
Green – Button 1
Yellow – Button 2
White and Brown – Unused
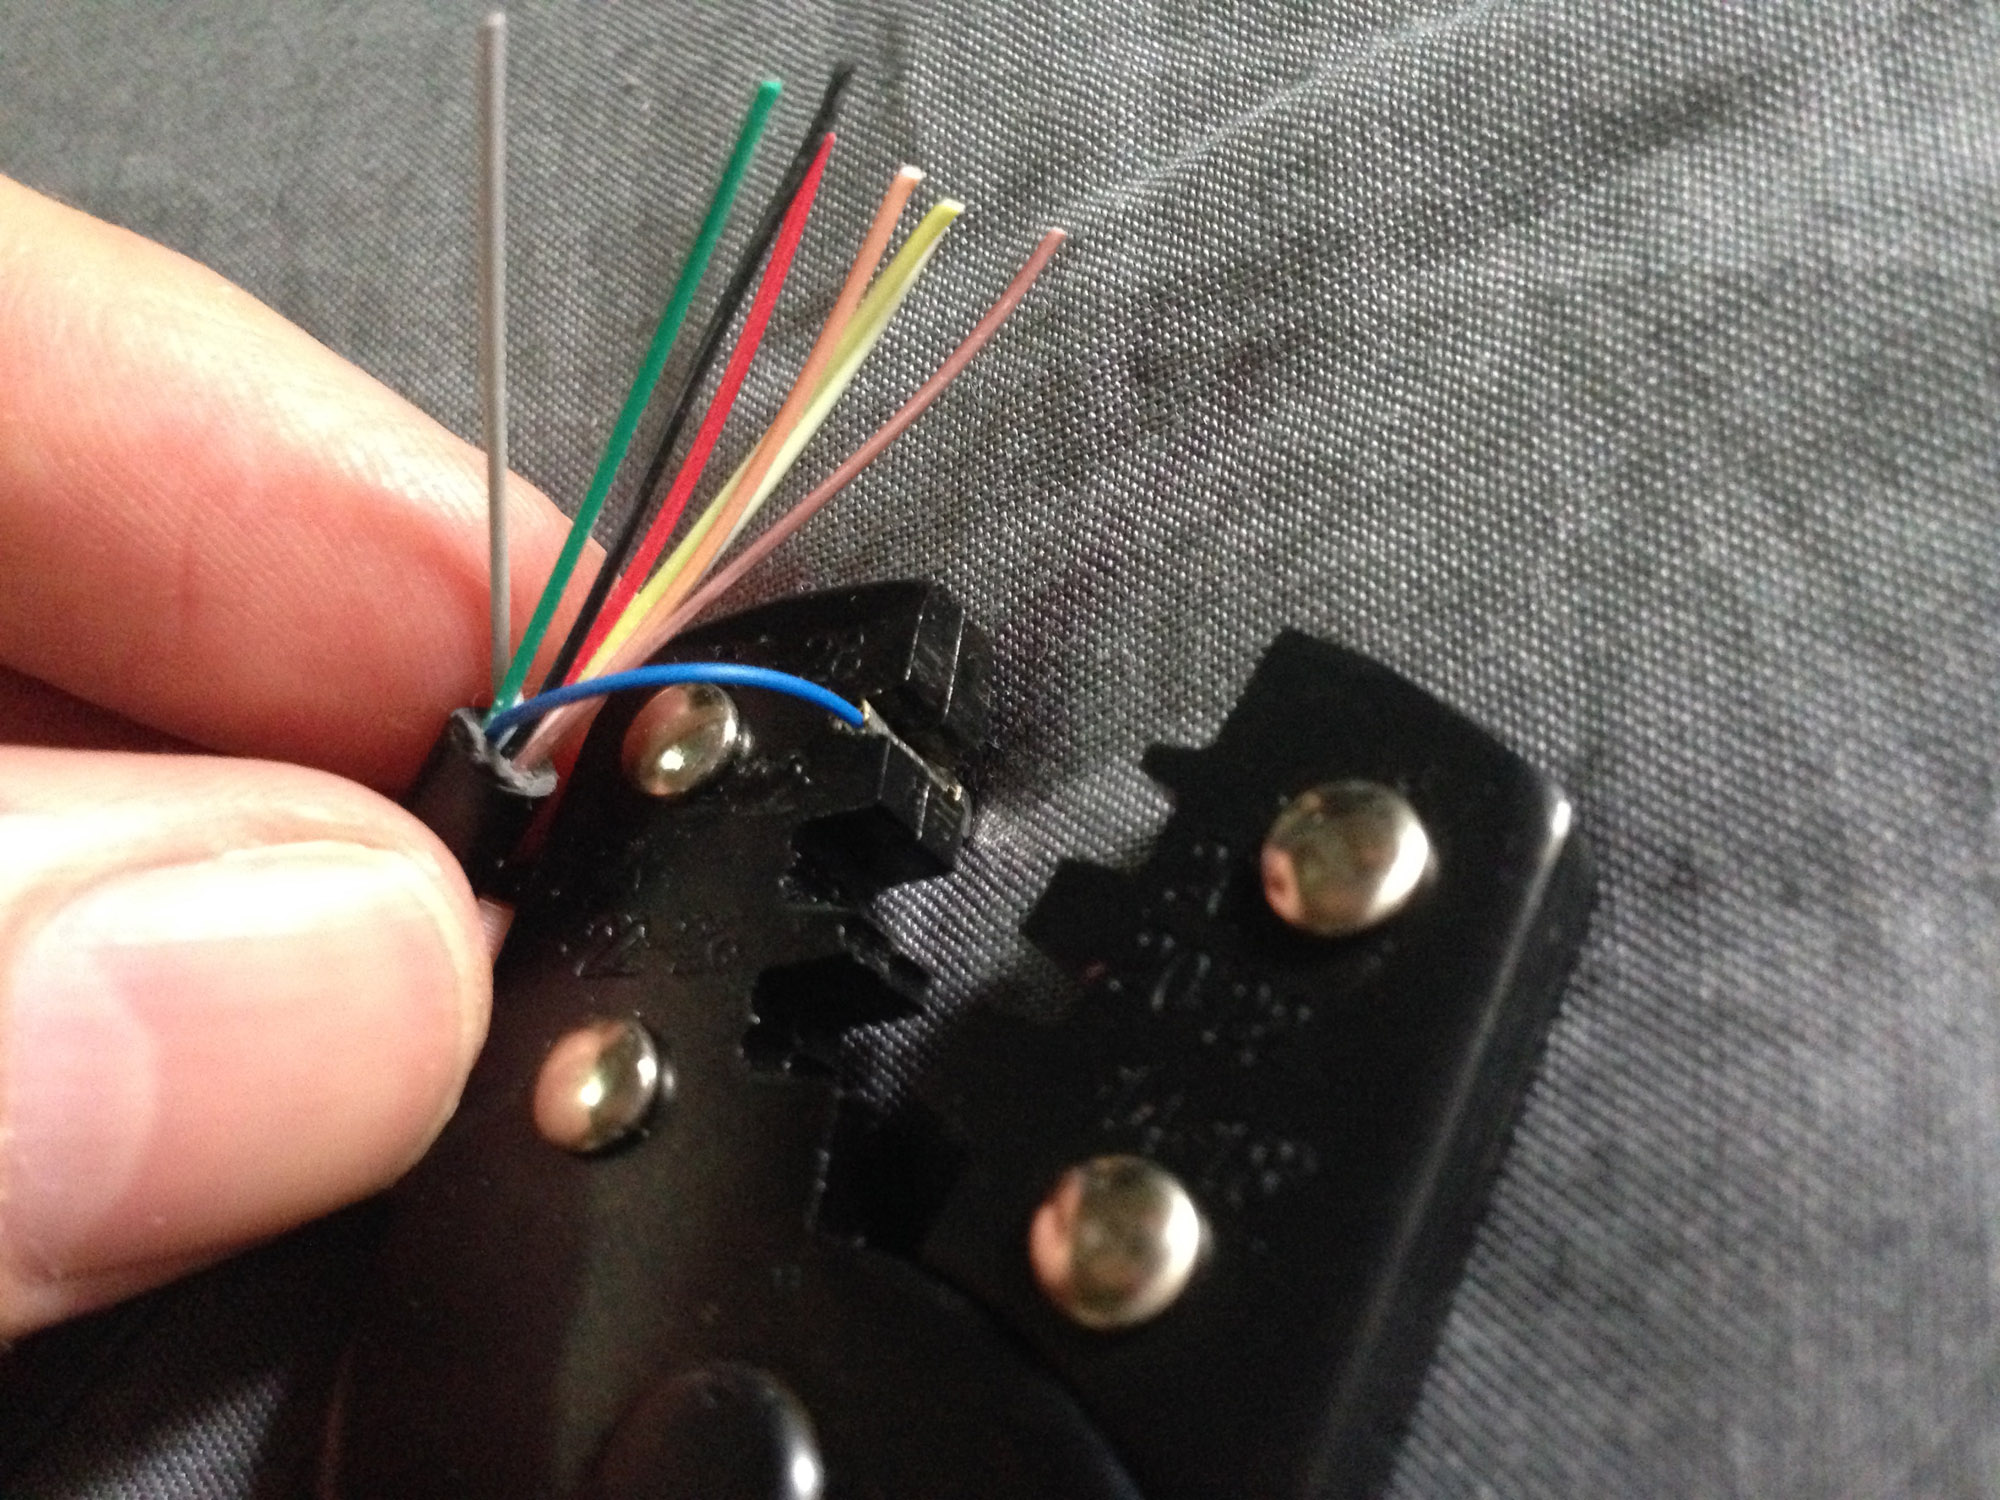
Crimp the relevant wires to the pins using the crimp tool. You can get away with using pliers, but a crimp tool will make a much cleaner and stronger… well… crimp.
The pins can then be plugged into the header plug in the correct order. Since I’m using an eight pin connector, it will stick out the back a bit, but there’s room and I’m not using position eight.
Slice off the unused two wires and we’re done.
Plug it into the console and close it up.
Now you can use pretty much any pre-Saturn Sega pad on your console. You can go period-accurate and use an SJ-150
All the way up to what was possibly the last DB9 Sega controller released – the wireless six button Mega Drive pad (doesn’t actually work but looks crazy)
Or if you’re insane, the standalone DB9 connector SJ-200, completely defeating the purpose of the exercise!
The best part about this ‘mod’ is it is completely reversible. However it would be relatively easy to install a DB9 socket on the side if you wanted something more permanent. Similarly, the rest of the extension cable could be soldered onto the original tethered controller, making it a standalone unit.
Nintendo and Sega had a famous rivalry in the 80s and 90s. In this post I’ll focus on a single element – the first party controllers of their 8-bit consoles.
———-
1981
The story begins before either company has released a cartridge based console. In 1982 Nintendo completely reinvents cheap directional input with the calculator style ‘plastic button above rubber membrane’ design of the directional controller pad (d-pad) in the Donkey Kong Game & Watch.
It’s equal to expensive microswitch arcade joysticks in speed, reliability and precision. It has great tactile feedback thanks to the ‘give’ of the rubber.
1983 Donkey Kong II
It is a vastly superior solution to the standard Atari-style joysticks of the time, whose sticks and buttons use primitive leaf connectors (bending metal) to register button/direction presses.
———-
1983
Nintendo releases the first edition of the Famicom. The controllers feature the Game & Watch d-pad, and like Donkey Kong, soft rubber action action (A/B) buttons. Also like Game & Watches, it features soft rubber function buttons (Start and Select).
The rubber buttons are usable, and suitable for simpler games, but are not as responsive as the d-pad is, and on hard presses can get stuck on the corners. For this reason (combined with a rare graphics glitch issue) Nintendo recalls these models in early 1984 and replaces them for customers. As such they’re relatively rare in the wild.
Of note, the Famicom features controller docks on the side of the console, so cords come out the side of the controllers to facilitate this.
Still 1983, Sega releases the SG1000 console. The console itself is a generation behind the Famicom, and the SG1000 controller (SJ-200) is a primitive old-paradigm joystick that uses the unreliable old leaf connectors. It also only has two buttons to the Famicom’s four (the console itself features a ‘Hold’ (pause) button on the main unit).
It’s an absolutely terrible controller. The mini joystick is equally as bad as an Atari VCS joystick, but cannot be as easily wrenched around to ‘force’ it to work like an Atari one, due to the small size and the way you hold it.
———-
1984
Nintendo updates the Famicom controller to have hard plastic over rubber membrane A/B buttons for better responsiveness. They leave the less commonly used function buttons as soft rubber.
A brilliant controller that basically sets a permanent industry standard.
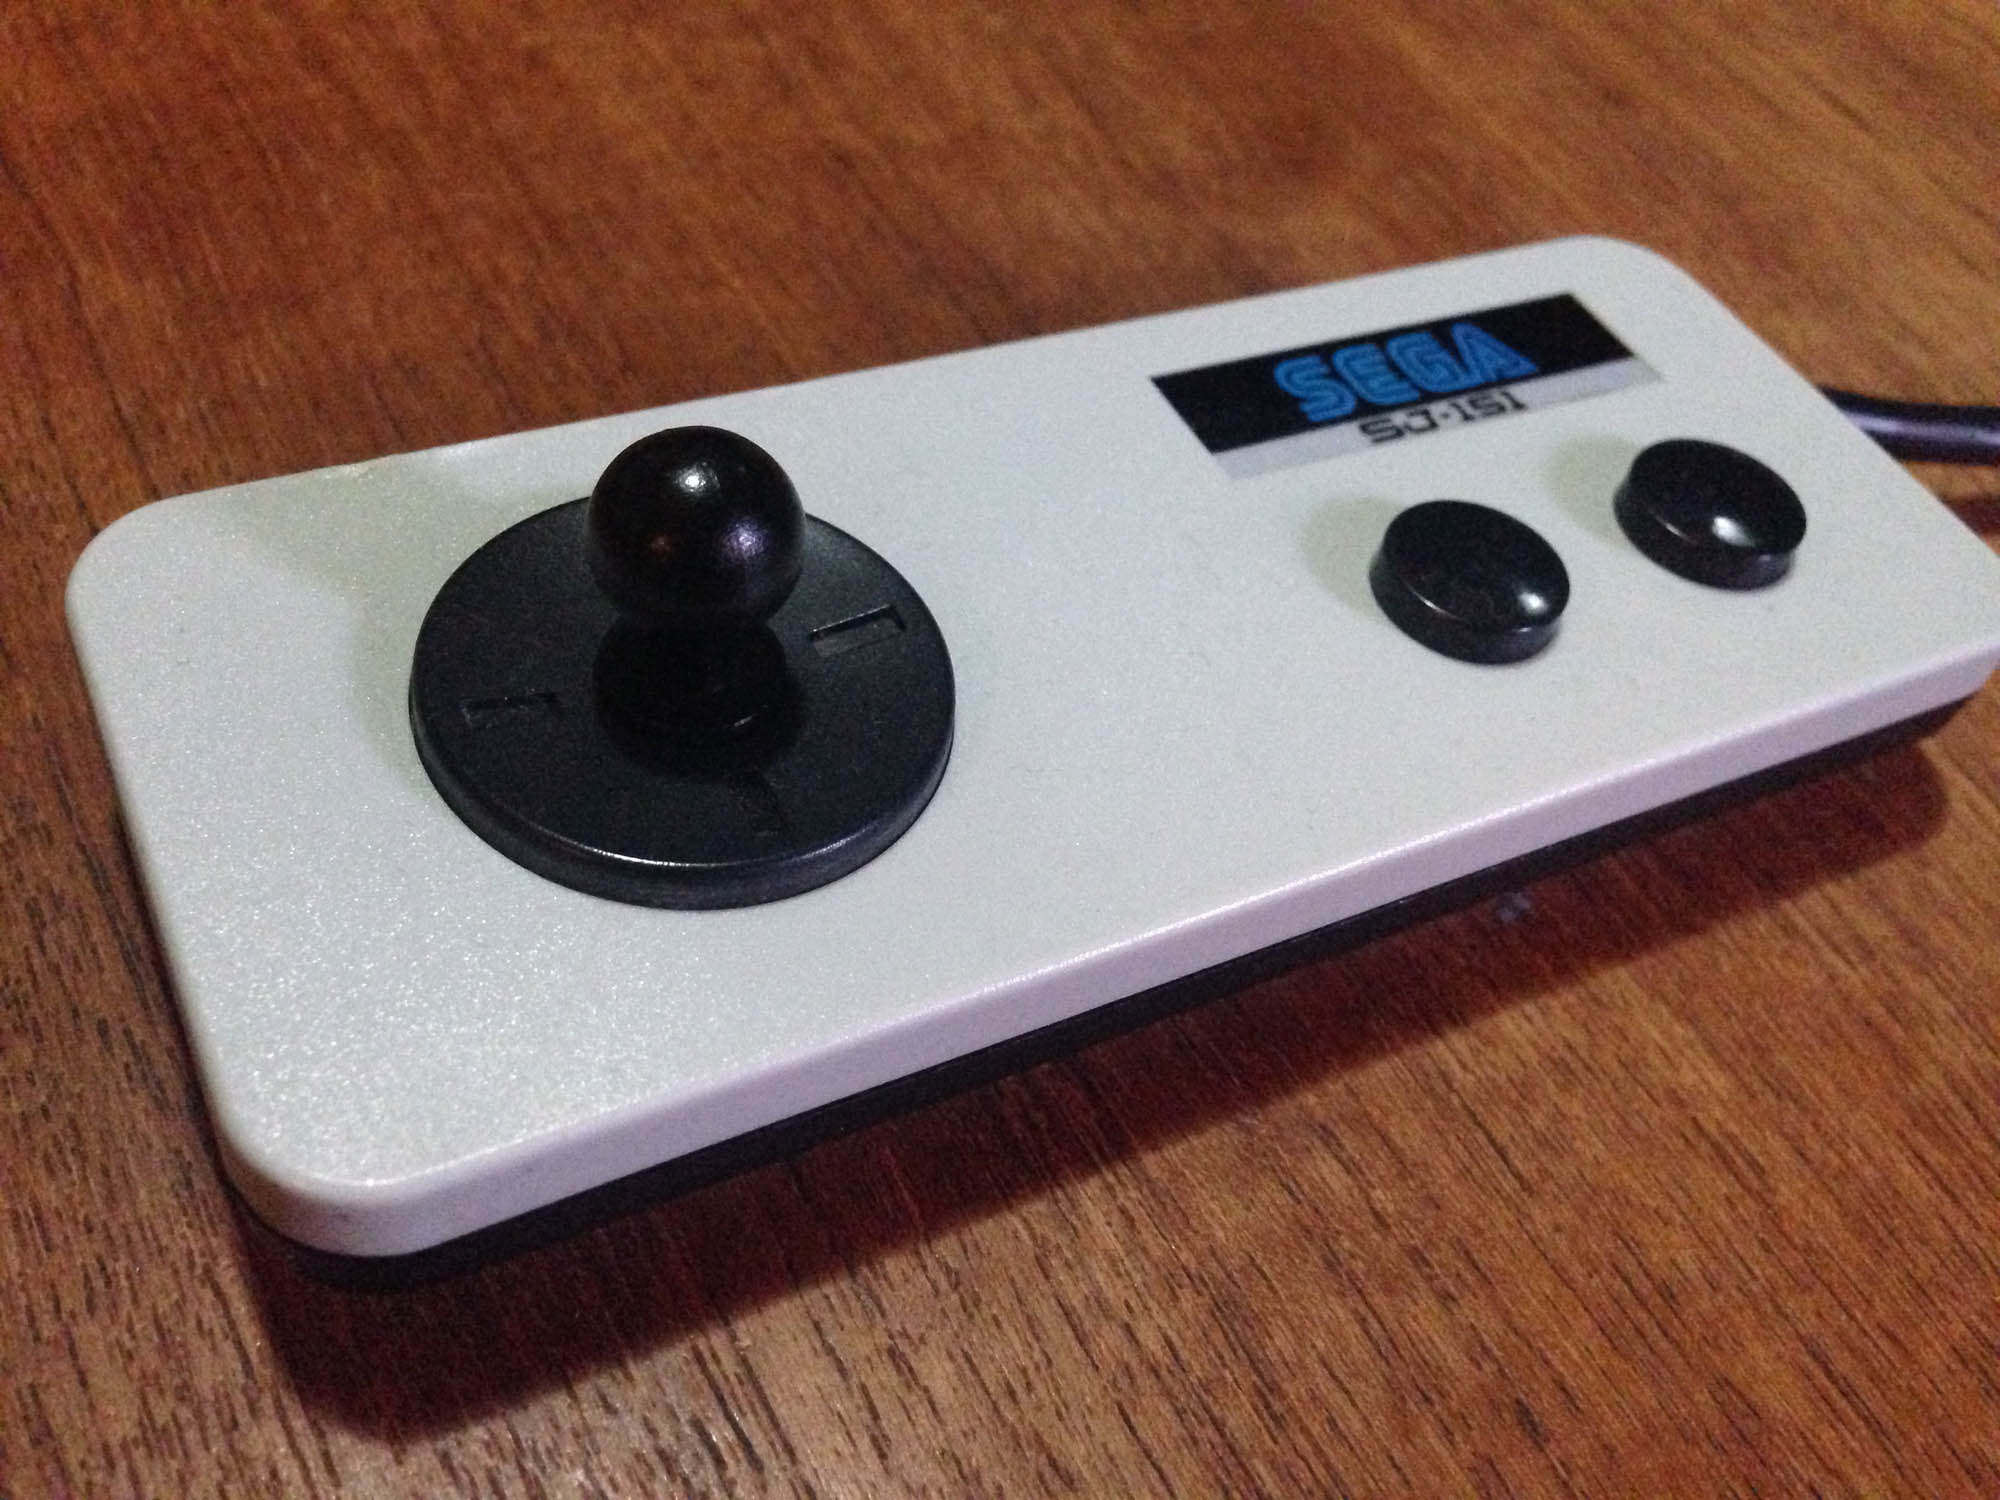
Later in the year, Sega releases the redesigned SG1000 II console, with the Famicom inspired SJ-150 controller.
The SJ-150 has a round variation of the Famicom d-pad, and a copy of the original Famicom soft rubber A/B buttons.
The new console ditches the unique look of the original SG1000, and takes more than a few design cues from the Famicom, including controller docks on the side of the console. Controllers are detachable from the console unlike the Famicom, but they plug in at the back, using an Atari-style DB-9 connector – a legacy of the original SG1000, which had a DB-9 plug for an optional second controller.
Interestingly, the SJ-150 tries to keep one foot in the old ‘joystick’ world, and comes with a little plastic stick which can be screwed into the middle of the d-pad, presumably for players who want some kind of joystick feel.
———-
1985
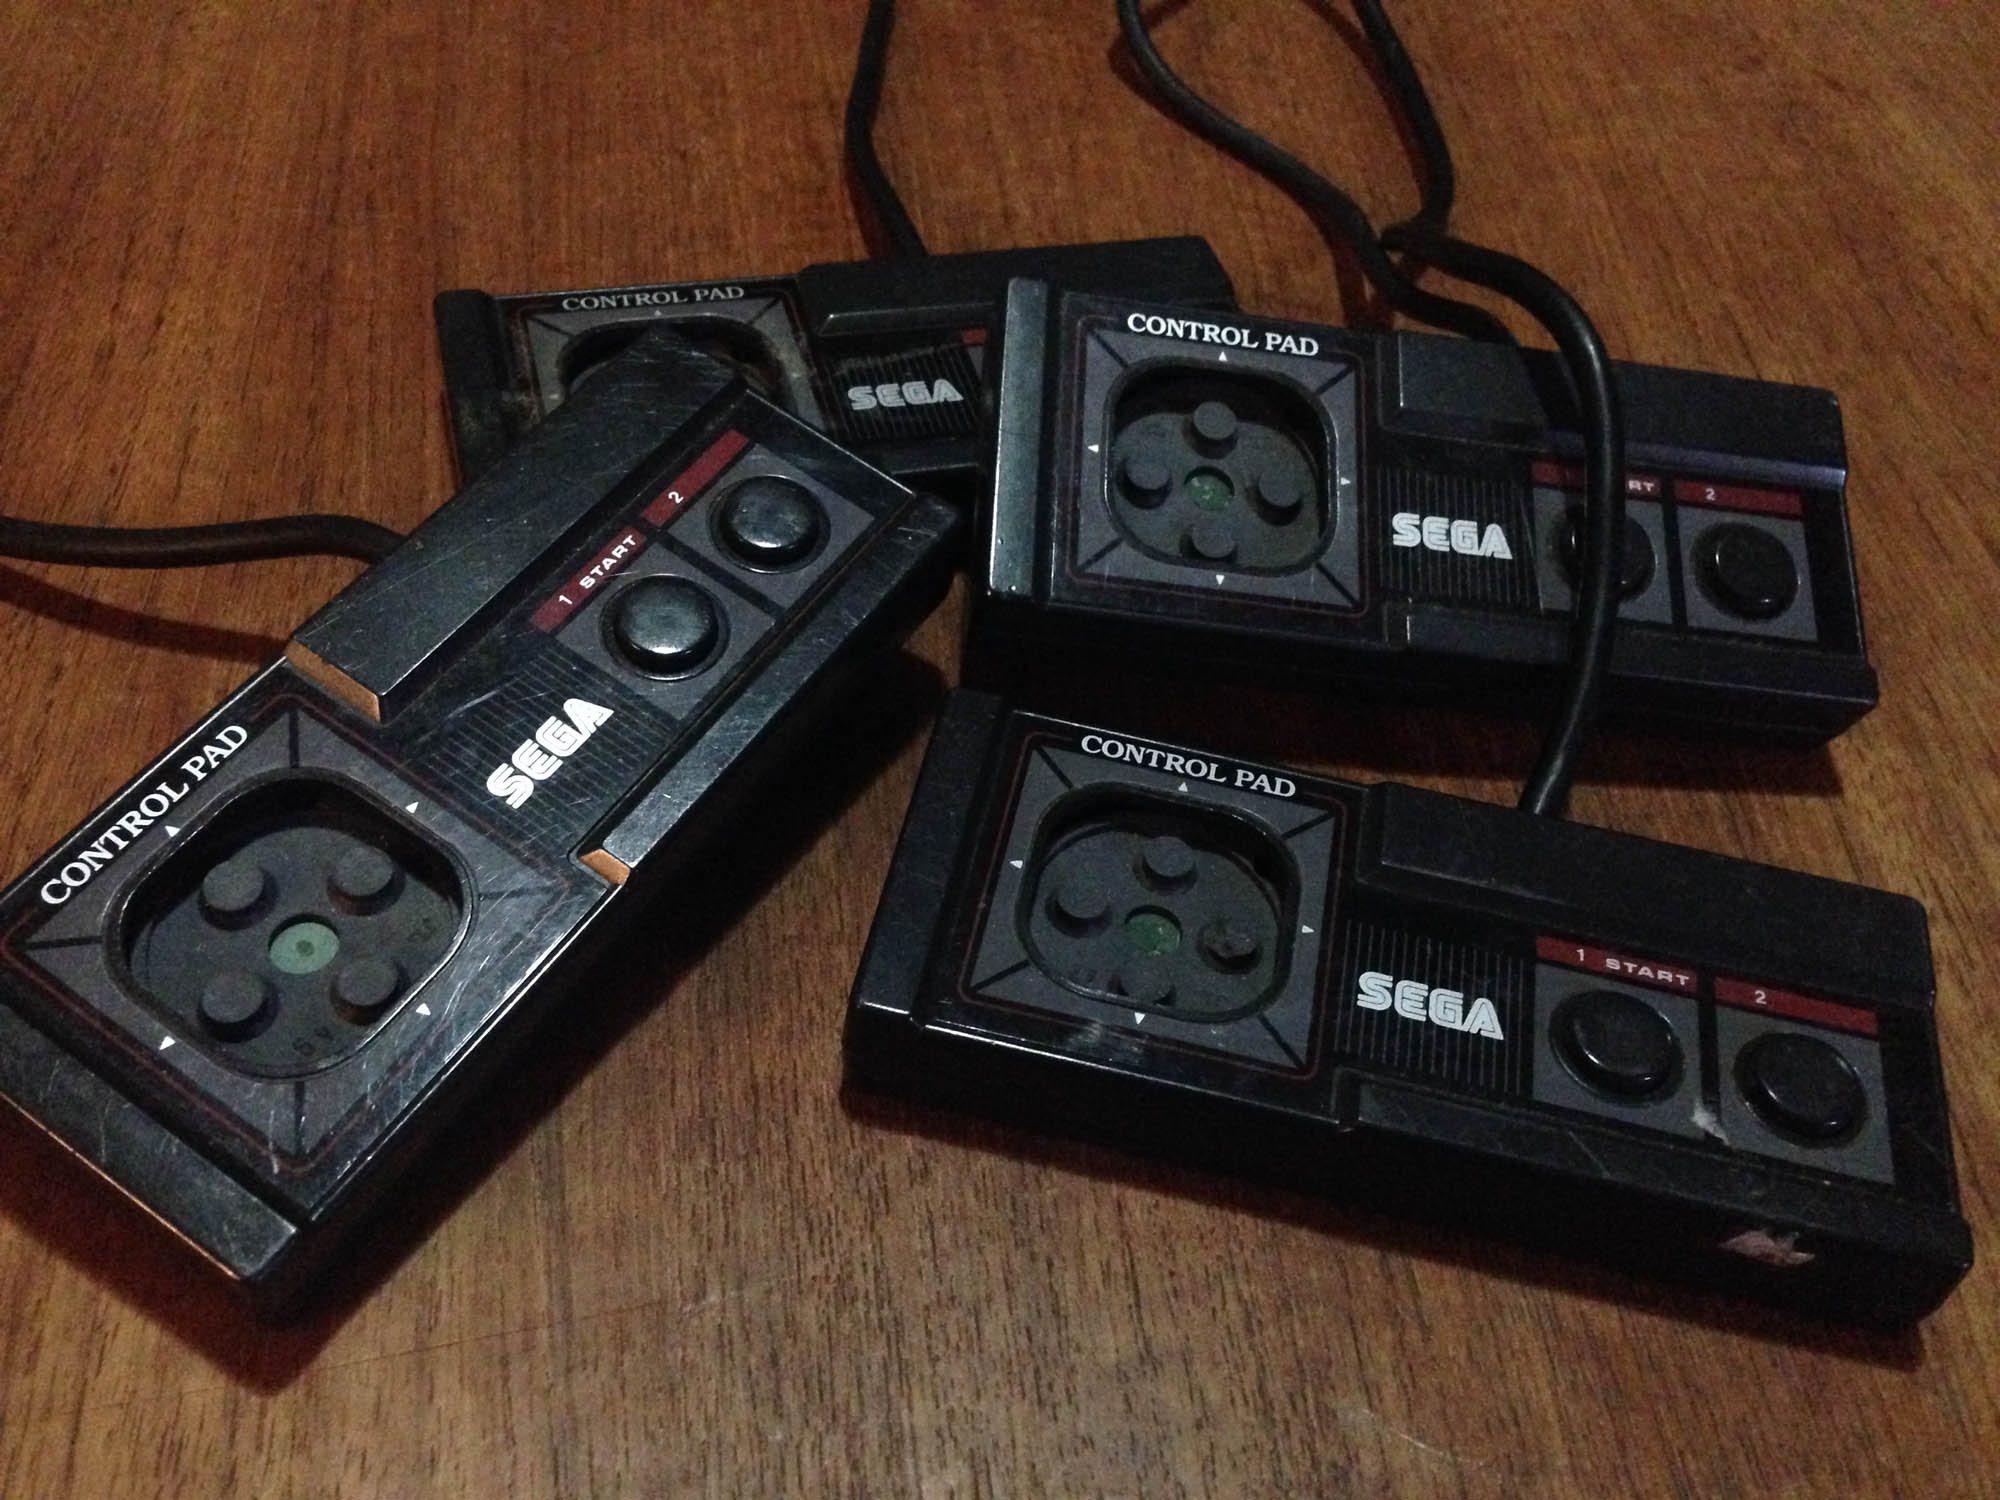
Sega releases the SJ-151 controller with later SG1000 II consoles, and it is moved up to the latest Famicom design, with hard plastic with rubber membrane A/B buttons.
This is the first all-round good Sega controller. It keeps the weird mini-joystick option.
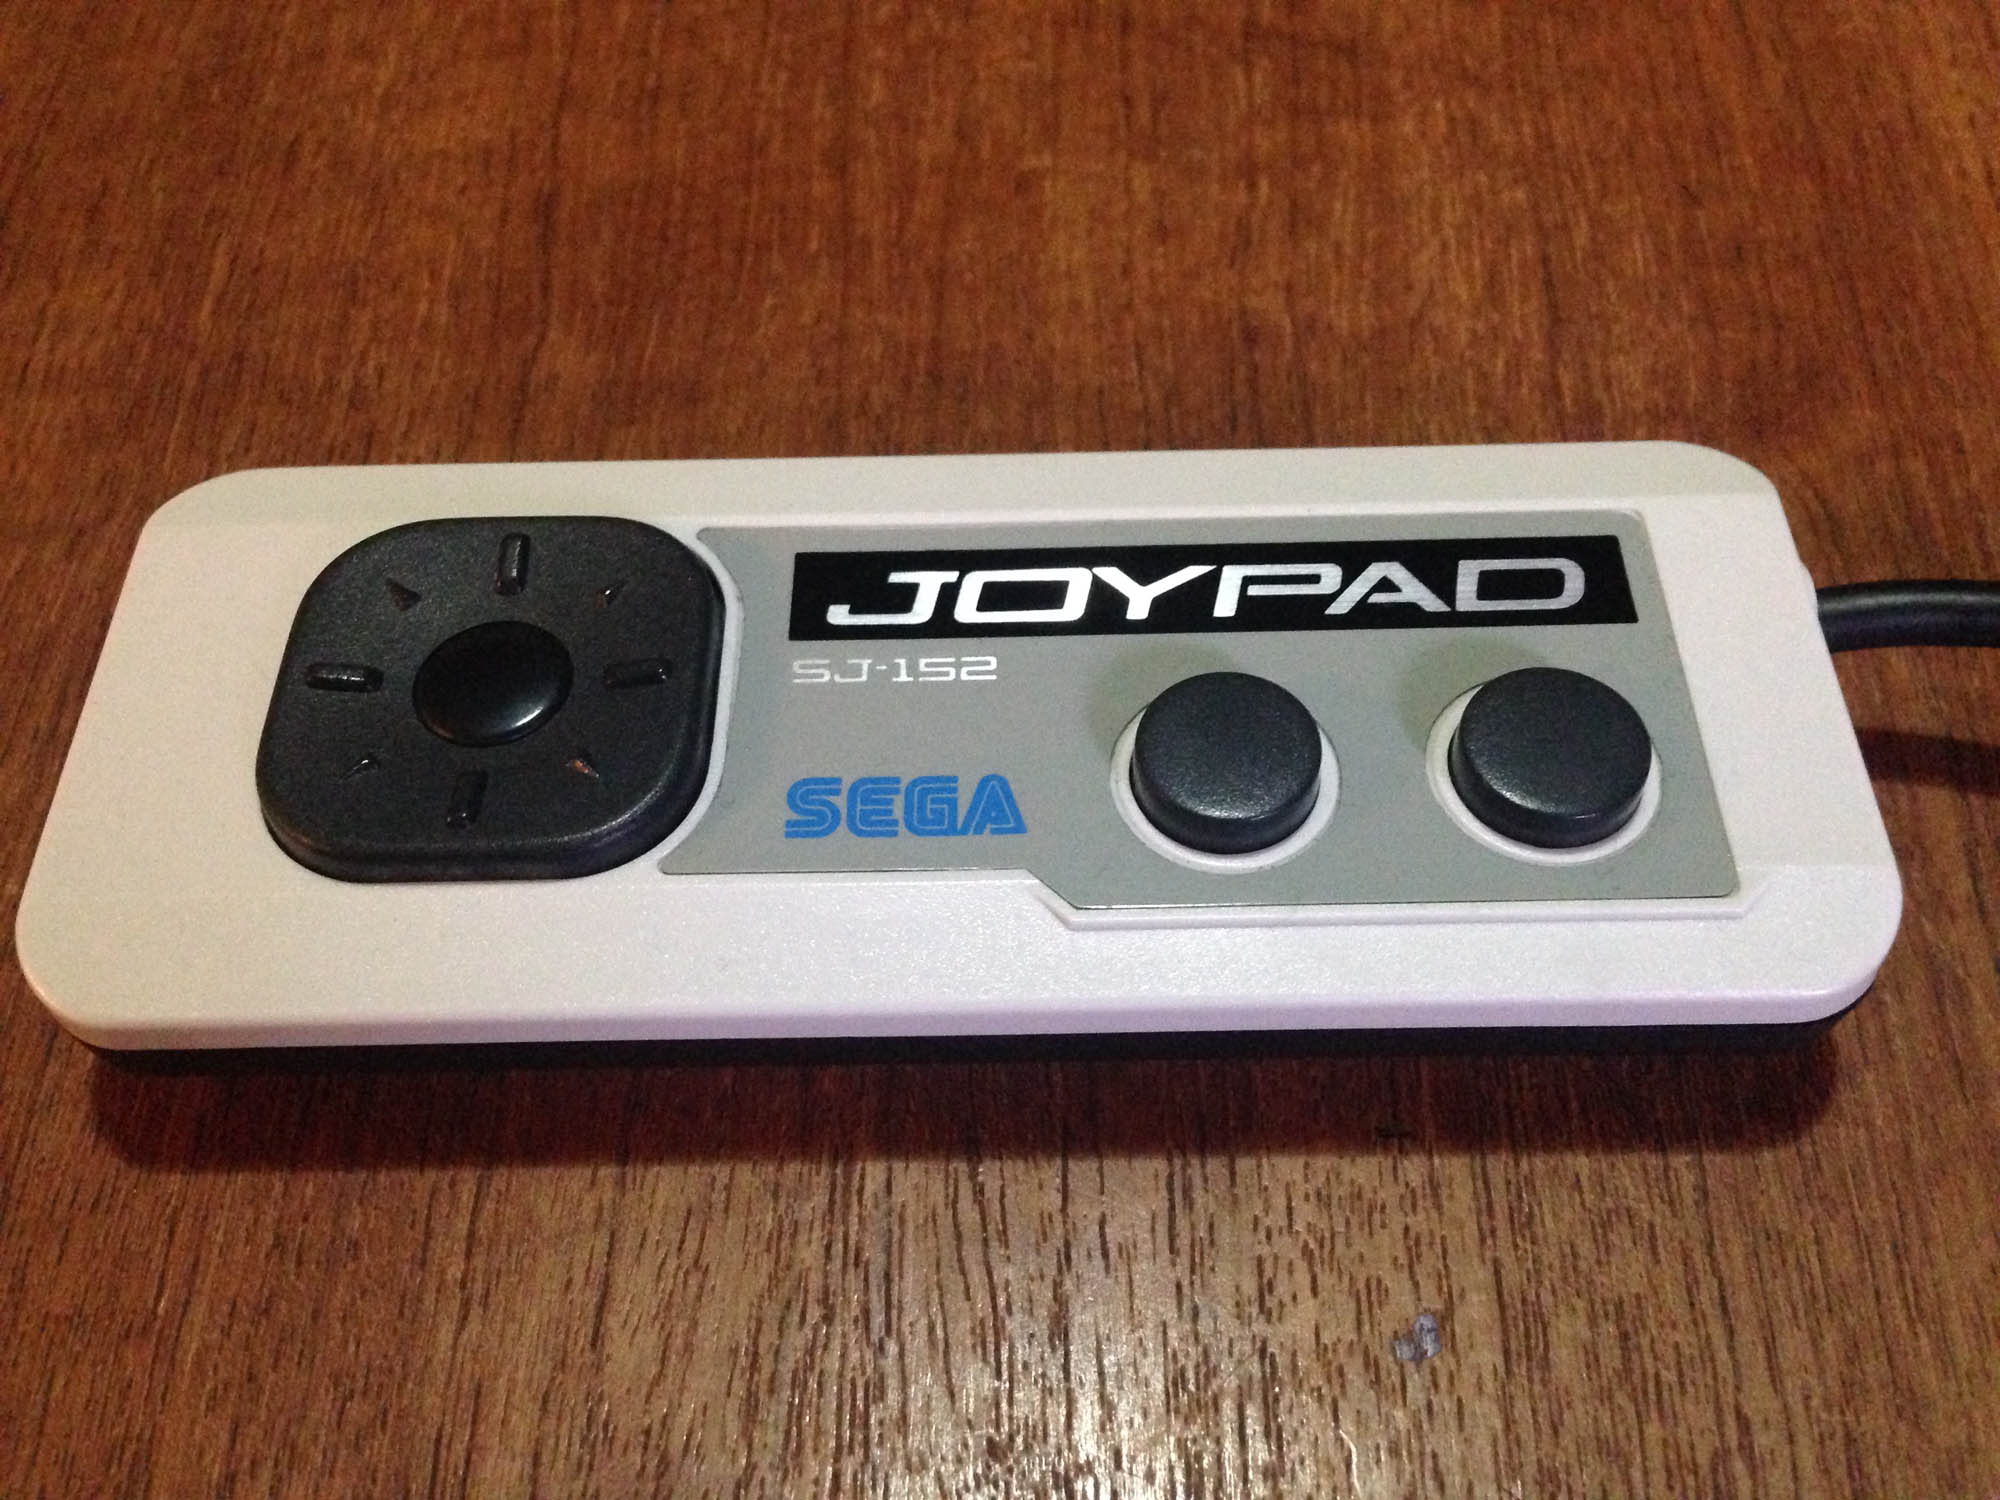
Later in 1985, Sega releases their upgrade to the SG1000 – the Mark III, with the SJ-152 controller, which is basically just a redesign of the SJ-151. It has more Famicom-like styling, with a reflective metallic sticker on the top mimicking the metal faceplate of the Famicom controller. Possibly due to the SG1000 legacy of the Mark III hardware, Sega is stuck with only two buttons for each controller.
The console continues to feature controller docks like the Famicom, though the controllers now plug into the front of the console.
It also retains the mini-joystick option. Someone must have liked it.
Later in 1985, Nintendo brings the Famicom west as the NES, with an externally redesigned (more squared off) controller that keeps all internals of the hard button Famicom pad as-is – it even uses the same board.
Due to the NES having no controller docks, Nintendo improves on the Famicom pad design slightly by having the cord come out the top instead of the side of the controller. It is however slightly less comfortable to hold due to the harder edges; the Famicom controller was nicely rounded.
———-
1986
Sega brings the Mark III west as the Master System, with an externally redesigned (more squared off) controller that keeps all the internals of the Mark III pad as-is – it even uses the same board.
It has some weird raised sections making hitting the buttons and d-pad less comfortable, though the d-pad is still the half decent one from the SJ-152. It is also less comfortable to hold due to the harder edges. Unfortunately, despite the Master System having no controller docks to necessitate it, the cord still comes out the side. It still has the mini-joystick option.
———-
1989ish?
After the release of Sega’s next system the Mega Drive, Sega begins positioning the Master System as a budget system in some of their more successful territories (mostly Europe and Australia/New Zealand). They revise the Master System pad to have the cord come out the top like the NES, and finally drop the mini joystick attachment.
At some point along the way Sega farm out all Master System production to China, and the non-Japanese controllers (and consoles) were much lower quality, and broke incredibly easily. Especially the d-pad, which had a cost-cutting redesign, making it less responsive as well as more prone to breaking.
No first party controller breaks as easily as the ‘top cord’ Master System pad.
———-
1993
After the release of the Super Famicom/Super NES, Nintendo repositions their older Famicom console as a budget machine – in Japan as the ‘AV Famicom’ and as a Top loading NES model in the USA/Europe.
The new Famicom/NES comes with a new Game Boy/Super Famicom inspired controller, affectionately known as the ‘dogbone’.
It’s a great controller, a very high quality build, and easily the most comfortable controller of the generation. Some players prefer the ‘flat’ AB button orientation over the Game Boy/SNES-style angled orientation. I prefer the angle.
———-
And that’s where that battle ended. Poor Sega were 1-3 years behind at every single step.
Here’s the whole lot in one shot.
My favourite Nintendo controller is either the beautiful round button Famicom pad (or my hybrid Famicom/NES controller), or the dogbone.
My favourite Sega controller is probably the SJ-151. It has the better buttons, and the round d-pad works just a little better – the square one has a bit too much face surface. The SJ-152 is also quite decent, and it looks less plain.
Sometimes it’s difficult being a fan of Japanese games when living outside of Japan. If you’re in a PAL country, older RF-only NTSC-J consoles cannot ever display properly on PAL screens. You could possibly tune in a fuzzy black and white picture with no sound, at best. Even if your TV was NTSC compatible via other inputs (eg composite), it is unlikely to support NTSC over RF.
You can mod most RF-only systems to output composite video or better, but personally I prefer not to mod rarer or older consoles such as the SG-1000, Color TV Game 6, or some of my original Famicoms.
No modding for you!
The traditional method was to use an NTSC-J compatible VCR which takes in the RF signal and outputs in PAL composite, but they’re getting harder to come by, are cumbersome, and you also end up with additional artifacting from the composite signal itself.
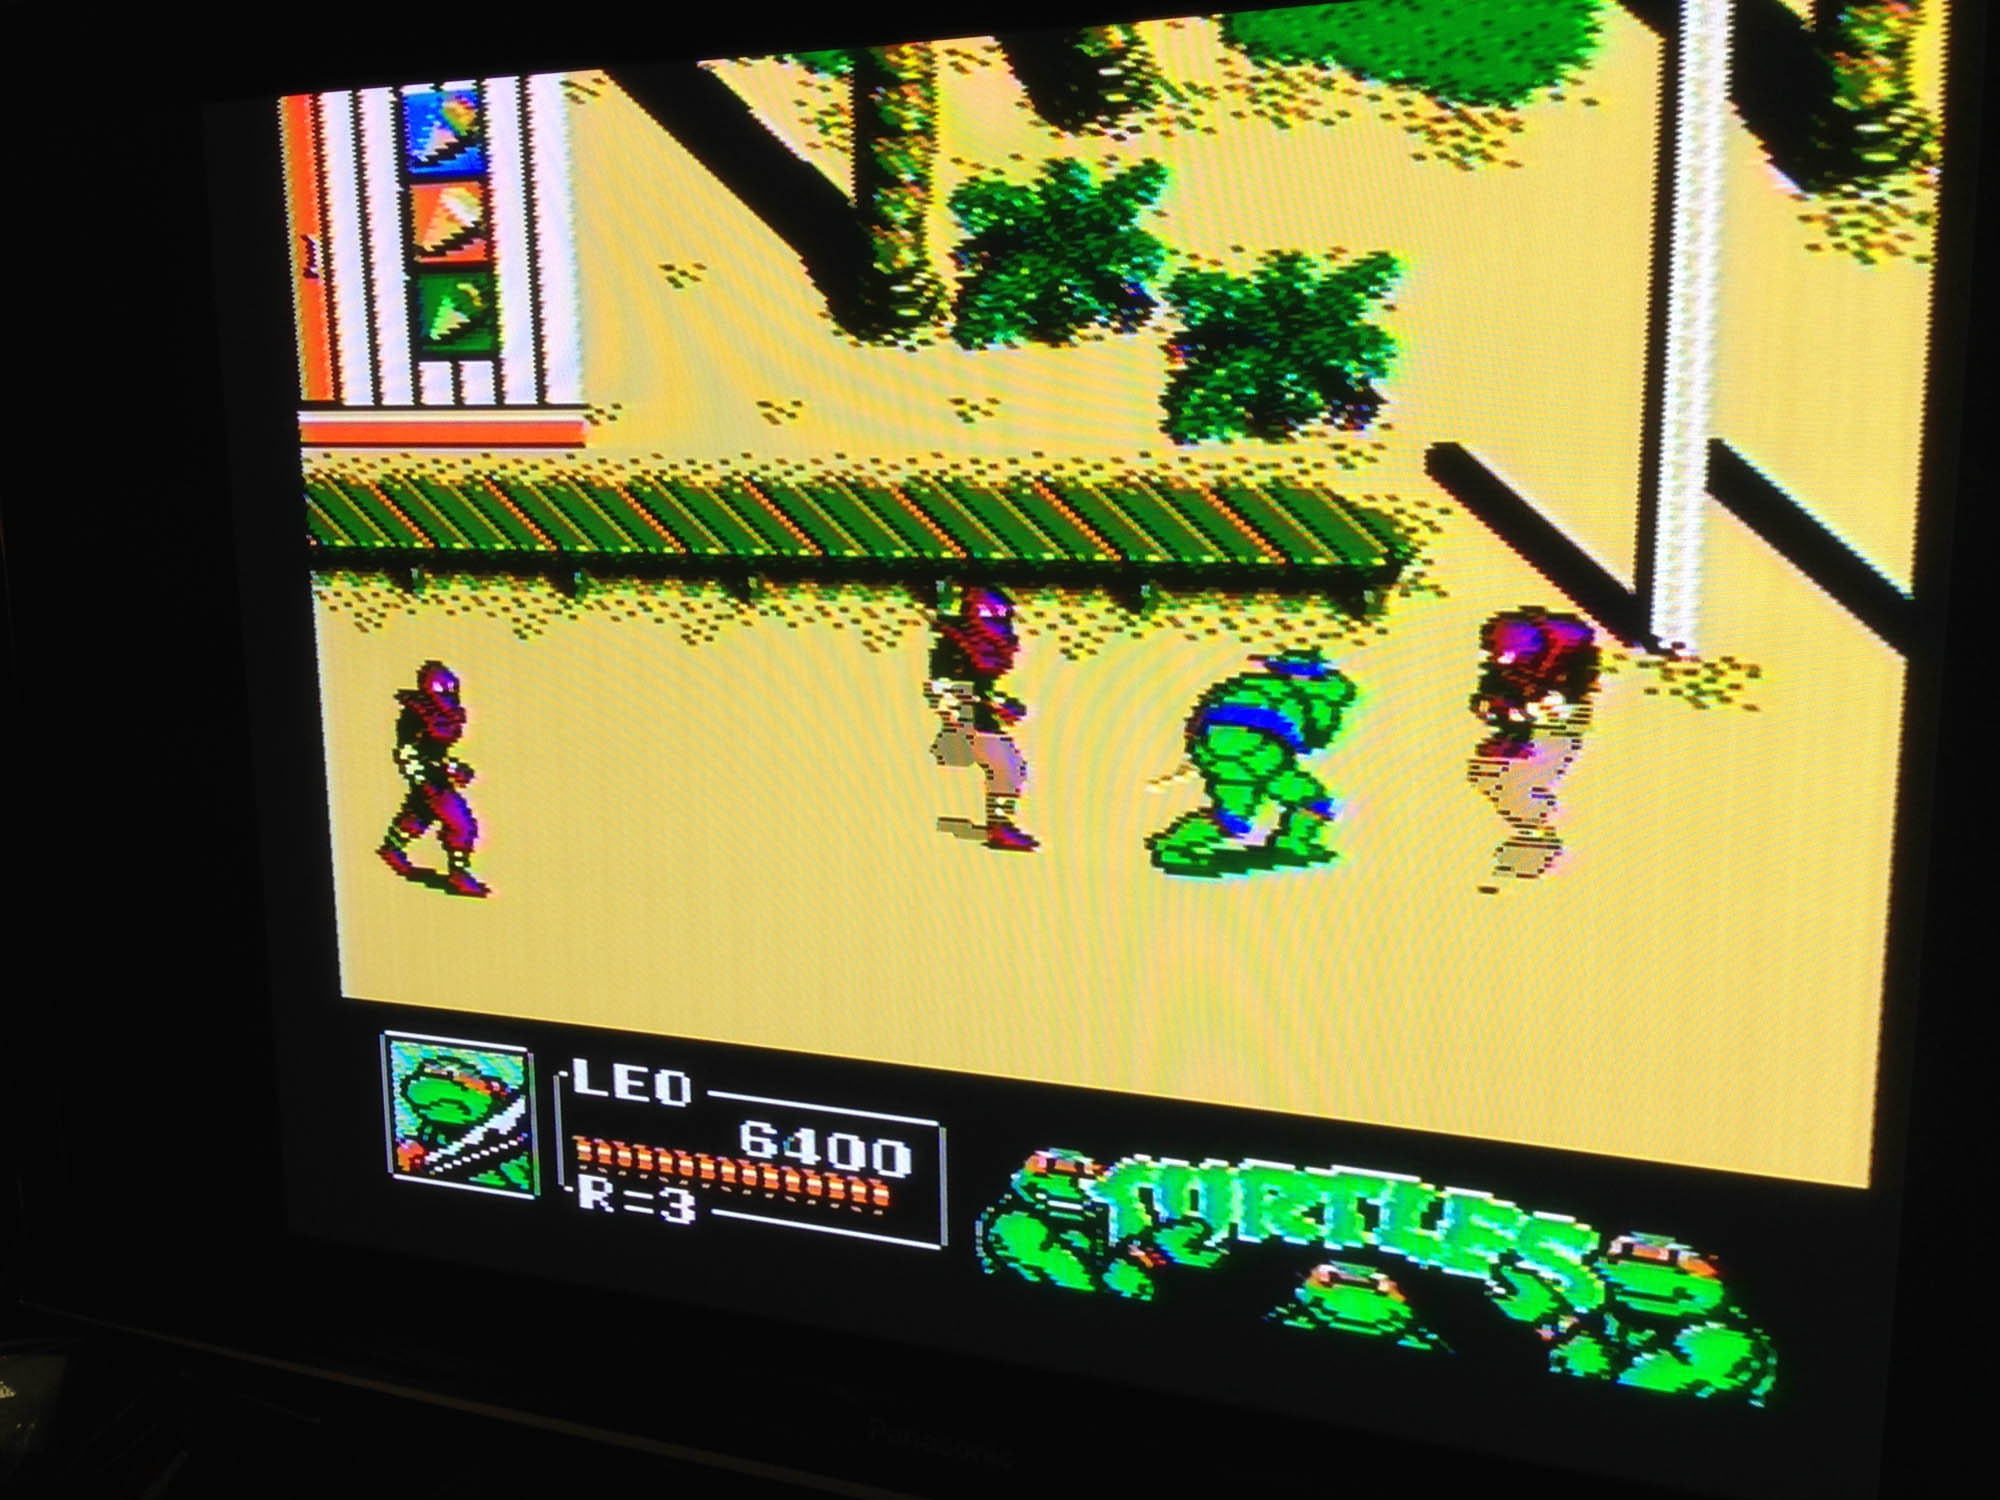
So here is a cheap solution, a $20 NTSC RF to VGA box – essentially designed as an external analogue NTSC TV capture card. It takes in RF (or composite via side inputs) and outputs in VGA plus 3.5mm stereo jack for audio, with various scaling options.
It can tune in these older consoles, and output via VGA, and the results are much better than I expected. The scaling, for what it can do with a fuzzy RF image, is quite solid. Options are selectable via an on-screen menu, and it even comes with a remote control.
And here are the results, Turtles 2 on on original Famicom to a 1080p Panasonic plasma.
The distortion lines are just from photographing the TV, it’s actually quite clean.
I’ve made a video of it running here:
The downside is that the tuner is NTSC-U, so still not 100% compatible with all Japanese consoles. I couldn’t get the SG-1000 working perfectly, the colours were off. However the Color TV Game 6 worked great, as did two different Famicoms, and a Super Famicom via RF.
It seems to have particular trouble getting sync with primarily plain background games. It eventually clicks and then stays in sync, but this can take a couple of minutes. However, in all these cases, sound is pretty much perfect the whole time.
Overall, it’s a pretty cheap solution to at least test RF consoles, and good enough to play many!
Update: I’ve since gotten a new TV which has no VGA input, but which has an international analogue tuner, so I no longer need or can use this box, but will hang onto it for possible future usages.
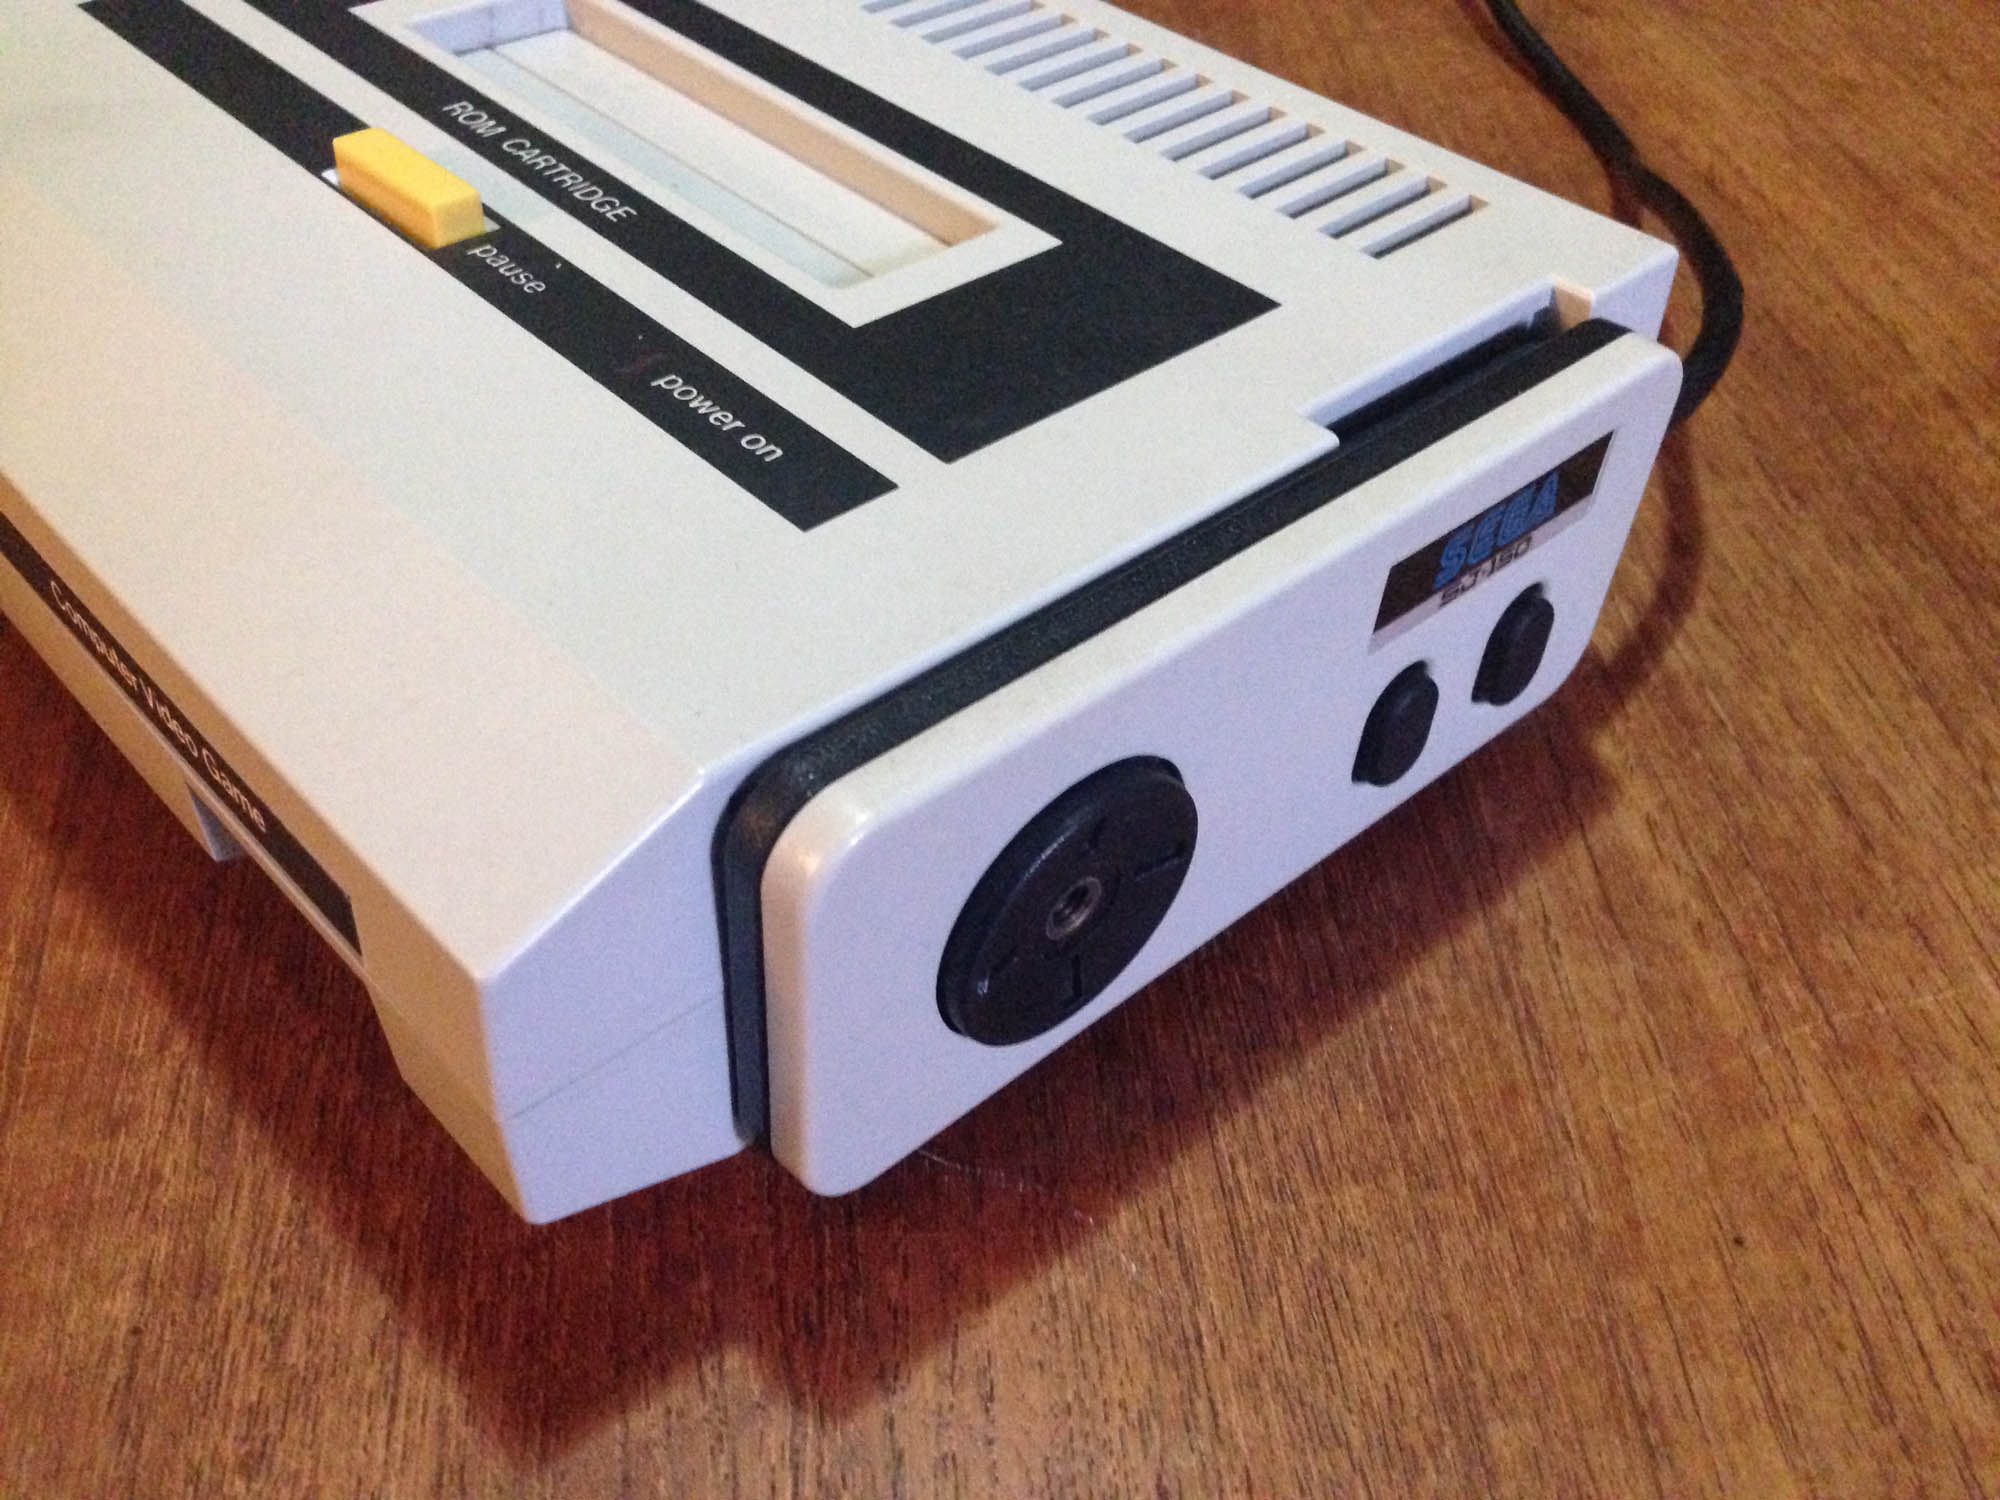
It was in 1983 that this website’s co-namesake entered the home video game market, with their first machine, the Sega SG-1000.
Released the same month as the Famicom (some sources claim the same day), it was a generation behind it in technology and design, featuring performance equivalent to the ColecoVision and first generation MSX. Sega couldn’t have predicted hurricane Famicom was about to redefine video games.
It plays Atari-style tall cassettes (cartridges), and features and Atari style joystick which is tethered to the left of the console.
The back features a port to attach a keyboard. ‘Home computer’ versions of the hardware with the keyboard integrated were released as the Sega SC-3000.
It can also play Sega My Card software (like Dragon Wang here) with the ‘Card Catcher’ adapter, which was released to coincide with the launch of the SG-1000 II a year later.
About that SJ-200 joystick – it’s pretty awful. Very similar in responsiveness to an original Atari VCS joystick, but with a worse design. Both the joystick and buttons are stiff and unresponsive, even in a perfectly working controller. Inside it uses a primitive bending metal ‘leaf connector’ system, which was cheap but no substitute for the microswitches in arcade joysticks, or the innovative rubber membrane system Nintendo utilised in its Game & Watch series and brought to the Famicom.
On the right of the console there’s a standard Sega controller connector plug, which unfortunately is only for player 2. Sega actually released an adapter that allowed you to open the console and replace the player 1 SJ-200 with another controller port, but it’s apparently impossible to find. I might try and make up a home-made one to use Mark III controllers.
Size-wise it’s comparable to a Mark III, and deceptively flat.
Output is RF-only, which means a classic fuzzy picture, if you can even tune it in (depending on where you live).
The Konami game ‘High School Graffiti: Mikie’ where you play as a teen heart throb, to the tune of Beatles classics.
It’s a pretty cool collector piece, but due to the joystick and RF-only output is not the best choice to actually play on. The Mark III is fully backward compatible with SG-1000 games, has the card slot built in, and (with a bit of ingenuity) has very nice RGB graphics output.


 On a side note, now that I have both true first edition models I should probably revise my 1983 Nintendo/Sega Face off article.


